 John M. Wargo
Domino & BlackBerry Java Applications Part 3

Posted: October 4, 2009 | | Categories: BlackBerry
Introduction
Note: removed obsolete attachments November 11, 2022
In Part 1 in this series, I showed how to build a simple Domino Web Service that performed a lookup against a contact database built from the standard public Domino Directory template (pubnames.ntf) and in Part 2 and Part 2.5 I demonstrated how to build the Java stub class that can be used to consume the web service.
In this installment, I'll demonstrate how to build a simple Java application that uses the generated code to access the web service. At this point, you'll need:
- A Domino server hosting the database provided in Part 1. The server must be running the HTTP process and the database ACL must be configured with the appropriate access.
- The generated class files for the service. These files were generated in Part 2.
- A functioning BlackBerry Java Development environment configured on your system that includes the appropriate Sun Java Development Kit (JDK) plus the appropriate BlackBerry Java development tools (either the JDE or the JDE Plug-in for Eclipse and the appropriate JDE Component package installed). Refer to the BlackBerry Developer's web site blackberry.com/developers for information on how to download and configure these tools. The ability to consume web services using JSR 172 was added in BlackBerry Device Software 4.3, so be sure you are using the right tools (version 4.3 or higher).
I'm going to assume you already know how to build a BlackBerry Java application – there's no time to dig into all of that before getting into the meat of this article. If you haven't worked with the BlackBerry Java development tools then you should either buy my book (bbdevfundamentals.com) or spend some time on the BlackBerry Developer's web site getting up to speed before continuing.
Building the Application
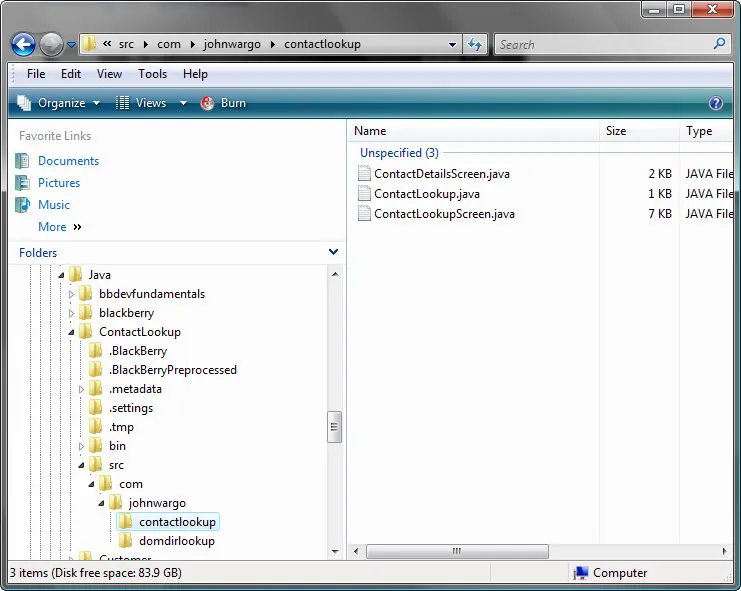
Attached to this article is a zip file containing all of the code for this application. If you extract the files, you will see a folder structure similar to the one shown in Figure 1. In the source folder you'll find the domdirlookup files generated in the previous installment and the contactLookup folder contains the source files for the application. The application's pretty simple – it consists of three Java class files which will be explained below.
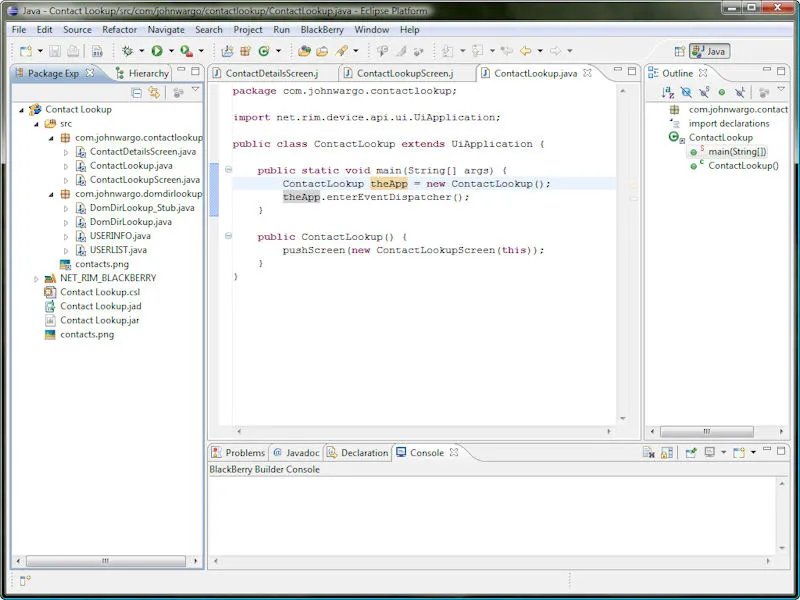
Start your development tool of choice (for me it's Eclipse) and open the project; you should see a screen similar to the one shown in Figure 2.
The main class for the application is the ContactLookup class defined in the contactLookup.java file in the project. There's nothing special about this class, it just defines a standard BlackBerry UiApplication called ContactLookup that creates and displays the ContactLookupScreen screen as shown in the following code:
package com.johnwargo.contactlookup;

import net.rim.device.api.ui.UiApplication;

public class ContactLookup extends UiApplication {

  public static void main(String[] args) {
    ContactLookup theApp = new ContactLookup();
    theApp.enterEventDispatcher();
  }

  public ContactLookup() {
    pushScreen(new ContactLookupScreen(this));
  }
}
Once it creates and displays the screen, it calls the application's enterEventDispatcher method which allows the application to respond to keyboard events and other interesting stuff any BlackBerry application has to do.
The ContactLookupScreen is defined in the ContactLookupScreen.java file in the project. This is where all of the interesting stuff happens. Take a look through the following code then I'll explain what's happening at the end.
package com.johnwargo.contactlookup;

import java.util.Vector;
import net.rim.device.api.system.Characters;
import net.rim.device.api.system.Display;
import net.rim.device.api.ui.DrawStyle;
import net.rim.device.api.ui.Graphics;
import net.rim.device.api.ui.MenuItem;
import net.rim.device.api.ui.component.Dialog;
import net.rim.device.api.ui.component.EditField;
import net.rim.device.api.ui.component.LabelField;
import net.rim.device.api.ui.component.ListField;
import net.rim.device.api.ui.component.ListFieldCallback;
import net.rim.device.api.ui.component.Menu;
import net.rim.device.api.ui.component.SeparatorField;
import net.rim.device.api.ui.component.Status;
import net.rim.device.api.ui.container.MainScreen;

import com.johnwargo.domdirlookup.DomDirLookup_Stub;
import com.johnwargo.domdirlookup.USERINFO;

final class ContactLookupScreen extends MainScreen {

  private static String promptString = "Please enter the last three characters of the contact's last name and press the menu button to continue.";
  private EditField editSearch;
  private ListField editList;
  private ListCallback myCallback;
  private DomDirLookup_Stub stub;
  private ContactLookup app;

  public ContactLookupScreen(ContactLookup app) {
    super(DEFAULT_MENU | DEFAULT_CLOSE);
    //Get a copy of the current application object so we can use it
    //to open the details screen
    this.app = app;
    //Set the title for the application window
    setTitle(new LabelField("Contact Lookup", LabelField.ELLIPSIS | LabelField.USE_ALL_WIDTH));
    //Add the label to the screen
    add(new LabelField(promptString));
    //Create a edit box to take the search screen
    editSearch = new EditField(EditField.FILTER_DEFAULT);
    //Add the search field to the screen
    add(editSearch);
    //Add a separator to delineate between the search string
    //and the list of contacts
    add(new SeparatorField());
    //Create a ListField to contain the search results
    editList = new ListField();
    myCallback = new ListCallback();
    editList.setCallback(myCallback);
    editList.setEmptyString("", DrawStyle.HCENTER);
    //Add the ListField to the screen
    add(editList);
  }

  public void makeMenu(Menu menu, int instance) {
    // Add the menu items to the menu when the user presses the button
    menu.add(mnuAbout);
    menu.add(mnuClose);
    // Only add the GetContcts when the edit field contains a value
    if (this.getLeafFieldWithFocus() == editSearch) {
      if (editSearch.getText().length() > 0) {
        menu.add(mnuGetContacts);
      }
    }
    // Add the Get Contact Details menu option of a name is selected
    if (!editList.isEmpty()) {
      // Does the user list have focus?
      if (this.getLeafFieldWithFocus() == editList) {
        // Then add the menu item
        menu.add(mnuGetContact);
      }
    }
  }

  public MenuItem mnuGetContacts = new MenuItem("Get Contact List", 100, 1) {
    public void run() {

      int i;  //Loop counter
      String[] userList;  //string array holds the list of contacts

      //Just in case there are previous results, erase
      //the list of items
      if (editList.getSize() > 0) {
        editList.setSize(0);
        myCallback.erase();
      }

      try {
        // If we haven't created a stub instance, create one
        if (stub == null) {
          stub = new DomDirLookup_Stub();
        }
        // Call the GetUserList function
        userList = stub.GETUSERLIST(editSearch.getText());
        // did we get any contacts back?
        if (userList.length > 0) {
          // For some reason the web service returns one extra entry,
          // so we'll just skip the first entry in the array.
          for (i = 0; i < userList.length; i++) {
            // Make room in the list box for the element
            editList.insert(i);
            // Then add the contact name to the list
            myCallback.insert(userList[i].toString(), i);
          }
          // Select the first item in the list
          editList.setSelectedIndex(0);
        } else {
          //Tell the user when there are no results
          Status.show("No contacts found.");
        }
      } catch (Exception ex) {
        Dialog.alert("Unable to connect to service. Service returned:\n" + ex.toString());
      }
    }
  };

  public MenuItem mnuGetContact = new MenuItem("Get Contact Details", 200, 2) {
    public void run() {

      USERINFO userInfo;  //holds the contact details

      //Just in case, make sure we have a selected item
      if (editList.getSelectedIndex() > -1) {
        try {
          //Call the web service, get the contact details
          userInfo = stub.GETUSERDETAILS(myCallback.get(editList, editList.getSelectedIndex()).toString());
          app.pushScreen(new ContactDetailsScreen(userInfo));
        } catch (Exception ex) {
          Dialog.alert("Unable to connect to service. Service returned:\n" + ex.toString());
        }
      }
    }
  };

  public MenuItem mnuAbout = new MenuItem("About", 200000, 9) {
    public void run() {
      Status.show("Created by:\nJohn M. Wargo\njohnwargo.com");
    }
  };

  public MenuItem mnuClose = new MenuItem("Close", 200000, 10) {
    public void run() {
      // Mark the form as NOT dirty so it doesn't prompt to save
      setDirty(false);
      // Leave the program
      System.exit(0);
    }
  };

  protected boolean keyChar(char c, int status, int time) {
    //Override keyChar to make sure Escape doesn't prompt
    //to save changes.
    if (c == Characters.ESCAPE) {
      this.setDirty(false);
    }
    return super.keyChar(c, status, time);
  }

  public static class ListCallback implements ListFieldCallback {

    private Vector listElements = new Vector();

    public void drawListRow(ListField list, Graphics g, int index, int y,
        int w) {
      String text = (String) listElements.elementAt(index);
      g.drawText(text, 0, y, 0, w);
    }

    public Object get(ListField list, int index) {
      return listElements.elementAt(index);
    }

    public int indexOfList(ListField list, String p, int s) {
      return listElements.indexOf(p, s);
    }

    public int getPreferredWidth(ListField list) {
      return Display.getWidth();
      // return Graphics.getScreenWidth();
    }

    public void insert(String toInsert, int index) {
      listElements.addElement(toInsert);
    }

    public void erase() {
      listElements.removeAllElements();
      listElements.setSize(0);
    }

  }; // ListCallBack

}
The source begins with a bunch of includes that add the libraries needed by the application. Of special notice are the stub libraries that were generated for this application:
import com.johnwargo.domdirlookup.DomDirLookup_Stub;
import com.johnwargo.domdirlookup.USERINFO;
With these classes imported, the application now has access to the objects needed to talk to the web service. In the ContactLookupScreen class, some objects are created that the application needs; mostly a string constant and the BlackBerry fields used on the screen. You should also notice the following:
private DomDirLookup_Stub stub;It defines an object that instantiates the capabilities provided by the stub class. It's through this object that the remainder of the code has access to the service.
In the constructor for the ContactLookupScreen, the text and fields are added to the screen. The callback method is set to allow the listField to be able to draw itself.
The makeMenu method defines the menu items available to the program. It's called whenever the user presses the menu button on the BlackBerry device. Notice that the 'Get Contact List' menu item is only added if there's something in the editSearch field (it's non-blank) and the 'Get Contact Details' menu item is only added when there's an item selected in the list of contacts (the editList field). It actually took me a little while to figure this one out. When you select an item in the list, the index for the selected item changes when you scroll off the list to access another field on the screen. If you scrolled up, then getSelectedIndex returns 0 and if you scroll off the bottom of the list, getSelectedIndex returns one less than the total number of items in the list. The result of this then is that you can really only tell if an item is selected in the list when the list actually has focus.
Once the screen is all setup, it sits there patiently waiting for the user to do something. When the user enters a search string and presses the menu button, the 'Get Contact List' menu item is available and executes the runnable defined in mnuGetContacts. The first thing it does is clear out the list of contacts left over from a previous search. It then checks to see if the stub has been initialized yet:
if (stub == null) {
  stub = new DomDirLookup_Stub();
}
After that, it makes the call to GETUSERLIST and passes in the text types into the editSearch field:
// Call the GetUserList function
userList = stub.GETUSERLIST(editSearch.getText());
// did we get any contacts back?
if (userList.length > 0) {
  // For some reason the web service returns one extra entry,
  // so we'll just skip the first entry in the array.
  for (i = 0; i < userList.length; i++) {
    // Make room in the list box for the element
    editList.insert(i);
    // Then add the contact name to the list
    myCallback.insert(userList[i].toString(), i);
  }
  // Select the first item in the list
  editList.setSelectedIndex(0);
} else {
  //Tell the user when there are no results
  Status.show("No contacts found.");
}
When the user selects a contact in the list returned from the call to GETUSERLIST and presses the BlackBerry menu button, the 'Get Contact Details' menu item is available and executes the runnable defined in mnuGetContact:
//create a USERINFO object to hold the contact details
//returned by the call to GetUserDetails
USERINFO userInfo;
//Just in case, make sure we have a selected item
if (editList.getSelectedIndex() > -1) {
  try {
    //Call the web service, get the contact details
    userInfo = stub.GETUSERDETAILS(myCallback.get(editList, editList.getSelectedIndex()).toString());
    app.pushScreen(new ContactDetailsScreen(userInfo));
  } catch (Exception ex) {
    Dialog.alert("Unable to connect to service. Service returned:\n" + ex.toString());
  }
}
In this case, it first creates an object to hold the UserInfo information returned by the web service then calls the GETUSERDETAILS method in the stub object passing in the name of the selected contact. As soon as it gets a result back from the web service, it creates the ContactDetailsScreen and displays it.
The ContactDetailsScreen is defined in the ContactDetailsScreen.java file in the project as shown below:
package com.johnwargo.contactlookup;

import net.rim.device.api.system.Characters;
import net.rim.device.api.ui.component.ActiveRichTextField;
import net.rim.device.api.ui.component.LabelField;
import net.rim.device.api.ui.container.*;

import com.johnwargo.domdirlookup.USERINFO;

final class ContactDetailsScreen extends MainScreen {

  public ContactDetailsScreen( USERINFO contactInfo ) {
    super(DEFAULT_MENU | DEFAULT_CLOSE);
    setTitle(new LabelField("Contact Details", LabelField.ELLIPSIS | LabelField.USE_ALL_WIDTH));
    add(new LabelField("Full Name:"));
    addActiveField(contactInfo.getFULLNAME().toString());
    add(new LabelField("Office Phone:"));
    addActiveField(contactInfo.getOFFICEPHONE().toString());
    add(new LabelField("Mobile Phone:"));
    addActiveField(contactInfo.getMOBILEPHONE().toString());
    add(new LabelField("Email Address:"));
    addActiveField(contactInfo.getEMAILADDRESS().toString());
  }

  public void addActiveField(String strValue) {
    //Create a temporary field
    ActiveRichTextField tmpField;
    //Create the field
    tmpField = new ActiveRichTextField(strValue);
    //Make it read only
    tmpField.setEditable(false);
    //Add the field to the screen
    add(tmpField);
  }

  protected boolean keyChar(char c, int status, int time) {
    // Override keyChar to make sure Escape doesn't prompt to save changes.
    if (c == Characters.ESCAPE) {
      this.setDirty(false);
    }
    return super.keyChar(c, status, time);
  }

}
What happens here is pretty straight forward. The screen is created and fields for each of the values returned by the web service are added. Notice that the application uses an ActiveRichTextField to display the field values. This is because the ActiveRichTextField automatically formats phone numbers, email addresses, web URL's, device PIN's as clickable areas allowing the user to click on one of these items to perform actions such as calling the selected phone number, sending an email to the selected address and so on. You don't have to do it this way for all fields; I just did them all the same way to make the application as simple as possible.
That's it – that's the program. For your own application, you'll need to plug in your stub class, initialize the stub and plug away.
Running the Application
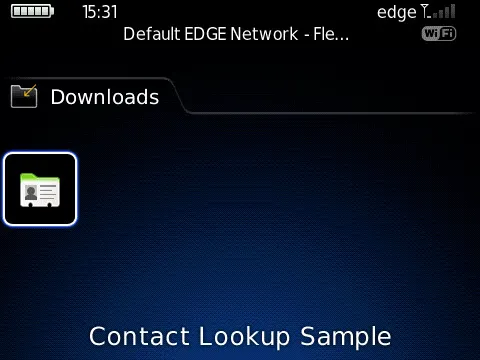
When you test the application in the simulator from your development environment, depending on the version of the BlackBerry Device Software you're running the application could appear in different places. In later versions, it will appear in the 'Downloads' folder as shown in the following figure.
When you open the application, you will be presented with the following screen:
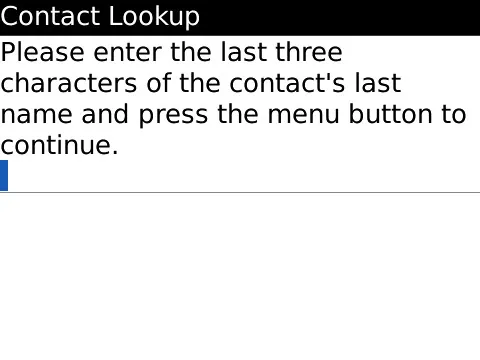
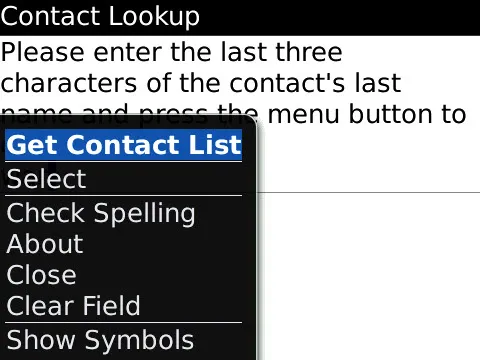
Enter the first three characters of the last name for a user who you know is defined in the database and press the BlackBerry menu button. You will see a screen similar to the one shown in Figure 5. If you press the menu button and there's no option for 'Get Contact List' be sure that you have something typed (at least one character) in the edit field highlighted in Figure 4.
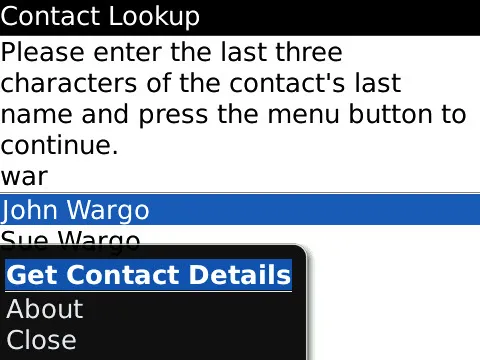
The application will contact the server and return a list of all of the contacts that match the search string as shown in the following figure.

Select one of the contacts in the list and press the BlackBerry menu button. Select 'Get Contact Details' from the menu as shown below.
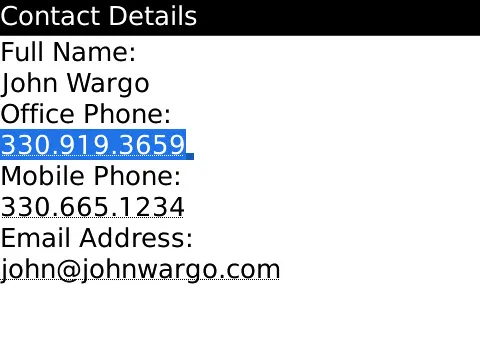
The server will return the contact information for the selected contact. Notice that the phone numbers and the email address are underlined – this indicates that they can be clicked to bring up a menu of options available to the user (such as calling the selected phone number or sending an email to the selected email address.
What's Missing?
You'll need to remember that the purpose of this article series is to show you how to access a Domino Web Service from a BlackBerry Java application. It is not meant to be a production quality application nor is it designed to cover every possible for this type of application. All is does is leverage the support for JSR 172 added in BlackBerry Device Software 4.3 to access the Domino Web Service. Before you can release an application like this into production, you must make accommodation for one or more of the following:
- Network Connection – The application doesn't make any accommodation for the type of network connection you want to use to connect to the Domino server. I'm not really sure how to do this on the BlackBerry when using JSR 172, but the end user has several connections available to them (MDS, BIS-B, Wi-Fi, WAP) and it may make sense to expend some effort determining the right connection to use for the best quality of service and smallest cost to the user. According to a knowledge base article I found, all you need to do is append the appropriate connection parameters in the service URL (in the stub) but I haven't confirmed this.
- Threading model – Because this is just a sample application, the calls to the Web Service are made on the main thread. For a production application, the calls should be made on a separate thread to ensure that regular application processing isn't interrupted while the connection is made to the Domino server.
- Authenticating against a secure service – The service I setup for this example was not configured to require credentials for access. In your production application, you may need to have the user authenticate before they can access the service.
- Signing the application – Because of the libraries used in this application, the application must be signed by Research In Motion before it will run on an actual device. Signing an application is easy, it's all built into the BlackBerry Java development tools. All you need to do is plunk down the $20 to purchase a set of signing keys and you're all set to go.
You'll probably also want to have the application clear the contact list when the user begins typing a value for the search string.
In the Next Installment
Well, I wasn't planning on another installment – this is supposed to be the end of this article series.
Here are links to all of the articles in the series:
- Domino & BlackBerry Java Applications - Part 1
- Domino & BlackBerry Java Applications - Part 2
- Domino & BlackBerry Java Applications Part 2.5
- Domino & BlackBerry Java Applications Part 3
Next and/or Previous Posts