
Writing a Book, Part 2 – Batch Archiving

Posted: May 6, 2010 | | Categories: Miscellaneous
Links On This Page
As I mentioned in the first article in this series here, I needed a way to have a sort of version control system (VCS) without installing a version control system. I wanted something simple, something that would work regardless of whether I was connected to a network. What I decided to do was use the batch file processing capabilities of WinZip to create complete backups of the manuscript (including all documents and images). With this system in place, I could execute the batch process at the end of any editing session (or in the middle if I had a lot of changes) and have a complete backup of everything in case I needed to revert to some older version or dig up some old content I'd deleted and shouldn't have.
Before I begin, it's probably important to let you know that while I was working on the manuscript and before I had a contract with a publisher, my working title for the book was Fundamentals of BlackBerry Application Development. Throughout this article and others in the series, you'll probably notice that I named everything with the abbreviated version of the title: FoBAD. What's funny though is that I also registered a web domain for the book as a placeholder. All of the options I wanted were already taken, so I went ahead and registered bbdevfundamentals.com. I figured I'd grab that domain and later, when I had the final title, at least I'd have a domain to use if the one connected to the official title was taken. As I negotiated with the publisher for the title, imagine my surprise when the final name my publisher came up with was BlackBerry Development Fundamentals which, when abbreviated, matched the name of the domain I already secured for the book's site.
The requirements for the solution were:
- The ability to execute the backup without selecting the files I wanted backed up every time
2. The ability to automatically set the backup archive file name using the current date and time – this allowed me to have a unique file name for every backup which would automatically sort as needed in any file listing (Windows Explorer or My Computer).
3. Take up as little file space as possible
Now let's dig into how to setup the batch process I needed for my project. When you open any of the later versions of WinZip in Classic mode, you'll see a window similar to the one shown in Figure 1. You'll need to click on the 'Backup' tab to expose the options you need to create batch processes.
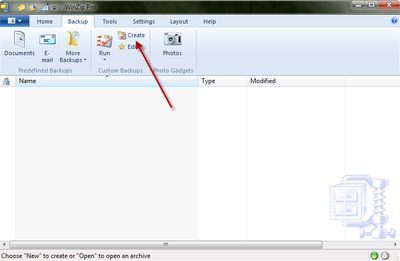
As highlighted in the figure, select 'Create' to create a new backup job. WinZip will prompt you to provide a file name for your backup job. I suggest you put the job somewhere else than the folder you will be backing up. Use either you're my Documents folder or, as shown in the figure, a folder immediately above the folder you will be backing-up. In this case, I named the file FoBAD Backup.
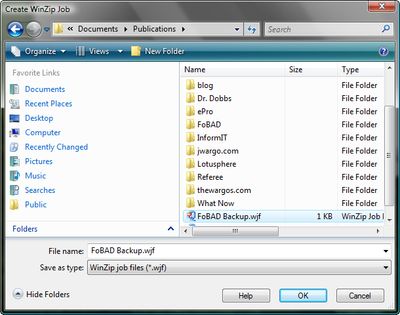
With the WinZip job created, it's time to start configuring the settings for the backup archive. WinZip uses a wizard metaphor for setting up jobs, so you'll be stepping through multiple screens as the job's settings are defined.
In the next part of the wizard, you're prompted to identify the files and folders that are included and excluded from the backup job. In this case, I want to backup the contents of my FoBAD folder, but I don't want to have to store my backups somewhere else. So, I'm including the FoBAD folder but excluding my Backup folder (as shown in Figure 3. For the manuscript, I also had a folder where I stored all of the source code and research documentation I used as reference for the book. Since the content of that folder never got updated (only new items added to it) I didn't feel the need to include those files in my backup – it would take up too much hard drive space to be useful and I can always replace the content through an internet search. You can see the folders I'm excluding by looking for the 'Exc+Sub' in the Action column in the figure.
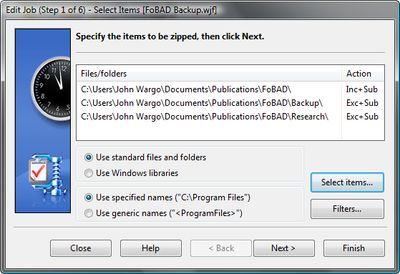
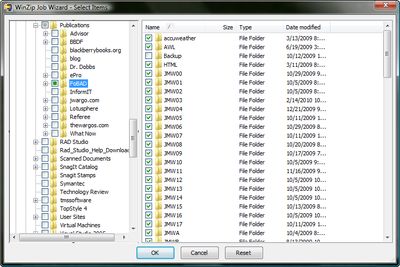
Click the 'Select items…' button to pick the items that are included and excluded from the backup job. The file selection dialog is shown in Figure 4. Place a check mark on the files or folders you want included.
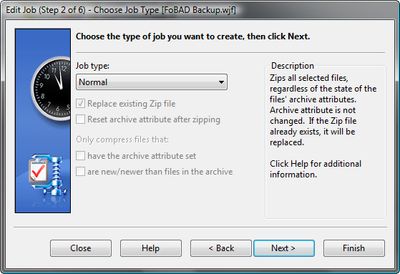
In the next step of the wizard, you can select which type of backup being performed. For my manuscript backup, I selected a normal backup which grabs all files regardless of the file's archive attribute setting. You can also use settings that allow for an incremental backup, differential backup or an update (refresh the contents of an existing backup archive).
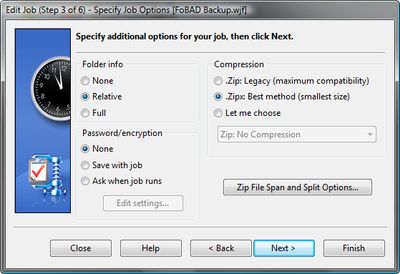
Next the wizard prompts you to select some additional settings for the archive. I like to use the selection for relative folder information – that way I don't end up with the full folder path in my archive. With relative folders set, only the folder structure information below the starting folder is included with each file.
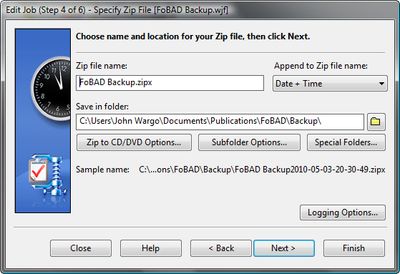
In the next step is where the batch processing capabilities of WinZip become most useful. As you can see in Figure 7, you can specify a root file name for the backup (in the 'Zip File Name' field) then append the current date and/or time to the file name as well.
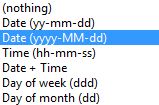
This feature supports additional options as shown in Figure 8.
You can also click the 'Subfolder Options…' button to specify the output folder options shown in Figure 9.
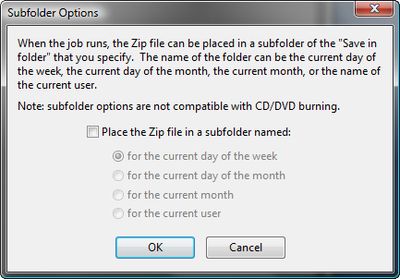
Or you can click the 'Special Folders…' button to specify the output folder options shown in Figure 10
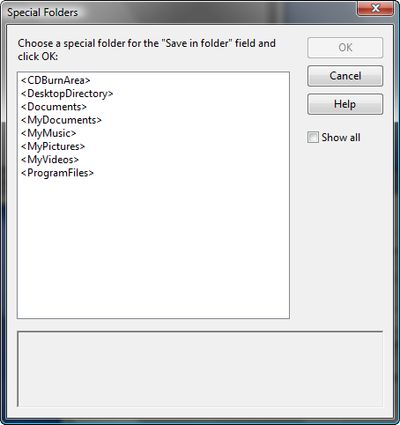
Clicking the next button gives you a summary of the job's settings as shown in Figure 11.
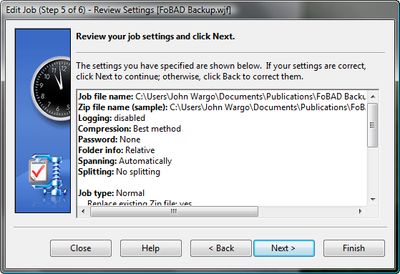
As this point, what I have is a backup job that backs up my manuscript folder but ignores the Backup and Research folders. The archive is called FoBAD BackupFILEDATETIME.zip or FoBAD BackupFILEDATETIME.zipx depending on which system I created the backup on. Figure 12 shows a snapshot of my Backup folder listing all of my backups.
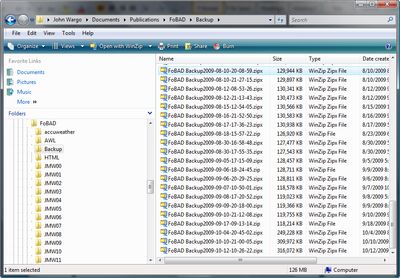
Notice the difference between the file extensions on many of the backups. On my laptop I have WinZip configured for Legacy mode (standard Zip file format) but on my desktop I have the new and improved file format in use (zipx). I did this because on my laptop I needed to share zip files with other people who didn't have a version of zip that supported the new file format. On my desktop I work in isolation, so the format of the zip files doesn't matter.
After the job was all setup, I created a shortcut on my desktop pointing to the backup job. To perform a backup, I merely double-click on the shortcut and the backup launches, runs and closes when it's all done. The first time you try this, WinZip will ask you whether you wish to execute or edit the job when it's opened; be sure to tell the program to execute it and you're all set. You'll have a quick and easy way to backup any project so you have access to all previous versions.
Look for other articles in the series.
- Writing a Book, Part 1 – Getting Started
- Writing a Book, Part 2 – Batch Archiving
- Writing a Book, Part 3 – Synchronizing Files
- Writing a Book, Part 4 – Fixing File Synchronization Errors
Next Post: Writing a Book, Part 3 – Synchronizing Files
Previous Post: Writing a Book, Part 1 – Getting Started
If this content helps you in some way, please consider buying me a coffee.
Header image: Photo by Marcos Paulo Prado on Unsplash