 John M. Wargo
Raspberry Pi Reminder Project

Posted: September 29, 2016 | | Categories: Raspberry Pi, Internet of Things (IoT)
Links On This Page
- Make Magazine
- https://shop.pimoroni.com/products/unicorn-hat
- https://youtu.be/X111pAaEP-k
- https://github.com/johnwargo/pi-remind
- Raspberry Pi
- https://raspberrypi.org/downloads/raspbian
- https://adafruit.com/products/2288
- https://amazon.com/CanaKit-Raspberry-Supply-Adapter-Charger/dp/B00MARDJZ4
- https://adafruit.com/products/2258
- https://adafruit.com/products/2336
- https://raspberrypi.org/documentation/installation/installing-images/README.md
- PyCharm IDE
- WebStorm Development on the Raspberry Pi
- https://developers.google.com/api-client-library/python/start/installation
- https://console.developers.google.com
- Autostart Python App on Raspberry Pi in a Terminal Window
Note: this article was originally published as Get a Flashing Meeting Reminder with a Raspberry Pi online at Make Magazine.
Introduction
I work at home and I spend a lot of time on the phone talking to clients and vendors. My employer uses Google Apps (which includes Google Calendar and Gmail) and the appointment notification capabilities of both are not very robust. Well, they're robust, but not enough to get my attention when I'm distracted. What I find is that I often miss the notification when I'm busy doing something else or I notice the notification, but quickly forget about just a few minutes later and ultimately miss some meetings or join late.
One day, after being 15 minutes for a meeting, I decided I had to fix this problem. I needed a more effective way to alert myself of upcoming appointments. As I spend a lot of time on the phone, I didn't want an audible alert, so I decided I'd do something visual. While browsing the Adafruit web site, I noticed the Pimoroni Unicorn HAT (https://shop.pimoroni.com/products/unicorn-hat) and that had me thinking of solution. The Unicorn HAT is an add-on board for the Raspberry Pi that consists of an 8x8 array (that's 64 total if you're counting) of bright RGB LEDs. What if I wrote a Raspberry Pi application that connected to Google Calendar and checked my calendar for my next appointment then flashed those 64 LEDs to let me know? As long as I was awake and in the room, I'd likely see the alert and decrease my chances of missing an appointment.
Well, that's what I did and I'll show you how to do it too. You can see the final project in action at https://youtu.be/X111pAaEP-k.
I ordered a Unicorn HAT then grabbed a Pi I had lying around and started writing code. The app for this project is written in Python, and is the first Python code I've written, so be gentle with me; you can find the code at https://github.com/johnwargo/pi-remind. The code checks the calendar every minute for appointments that start within the next 10 minutes. If there's an appointment starting between 10 and 5 minutes from now, the lights will all flash white for a second or so. Between 5 and 2 minutes, the lights will all flash yellow twice. At less than two minutes until the appointment start, the lights will swirl in a multi-color splash. I'll describe how to more interesting things with the lights at the end of the article.
The hardware for the project is pretty simple, all you need is a Pi, the Unicorn HAT, a power supply and a case for the Pi. You should be able to acquire the parts for less than $70US and assemble it all in just a few minutes.
Components
For this project, I used the following components:
- Raspberry Pi. The Pimoroni Unicorn HAT supports Raspberry Pi models 3, 2, B+, and A+, so you'll have to pick one of them. For this project I used a Raspberry Pi 2 Model B.
- Micro SD memory card (4 GB or higher) to hold Raspbian, the Raspberry Pi OS (https://raspberrypi.org/downloads/raspbian).
- Pimoroni Unicorn HAT. I purchased mine from Adafruit (https://adafruit.com/products/2288).
- Raspberry Pi Power Supply. Any Pi compatible power supply will work, I used the CanaKit 5V 2.5A Raspberry Pi 3 Power Supply / Adapter / Charger (https://amazon.com/CanaKit-Raspberry-Supply-Adapter-Charger/dp/B00MARDJZ4).
- Raspberry Pi case. Again, you can use whatever case you want, I selected the Adafruit Raspberry Pi B+ / Pi 2 / Pi 3 Case - Smoke Base - w/ Clear Top (https://adafruit.com/products/2258). I picked this one because it had a clear front, so the lights would show clearly even with the top on, and because it looked cool.
Assembling the Hardware
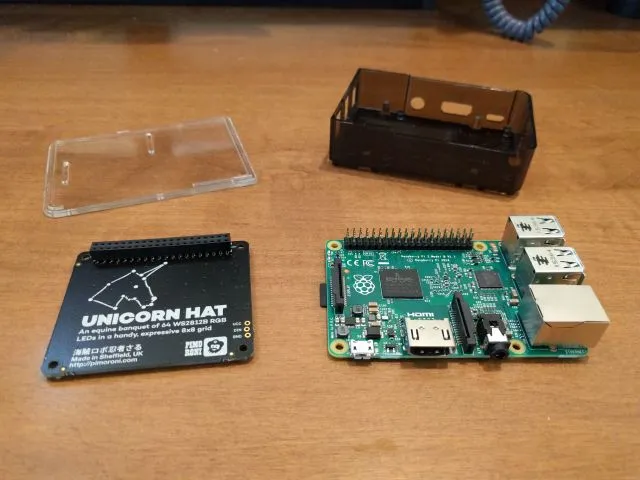
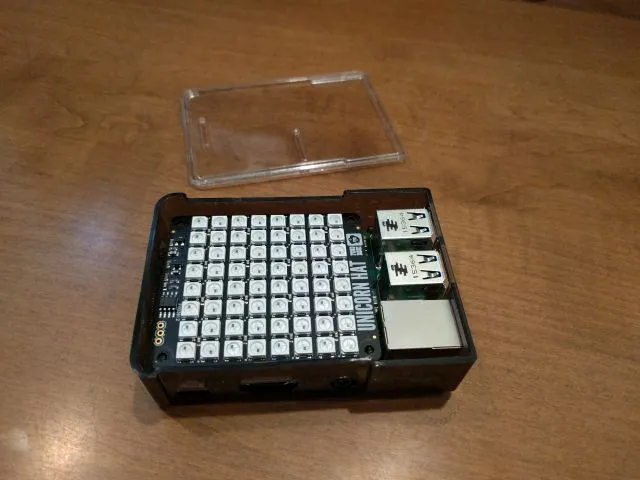
Figure 1 shows the parts I used for this project (minus the power supply). The Unicorn HAT on the left is facing down so you can easily see the female headers on the back of the board that match the male Pi's GPIO headers.
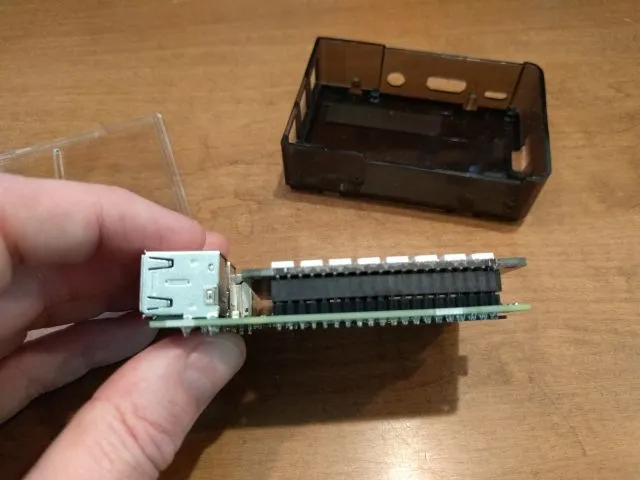
Flip the Unicorn HAT over and align the GPIO Pins with the female header socket on the HAT as shown in Figure 2
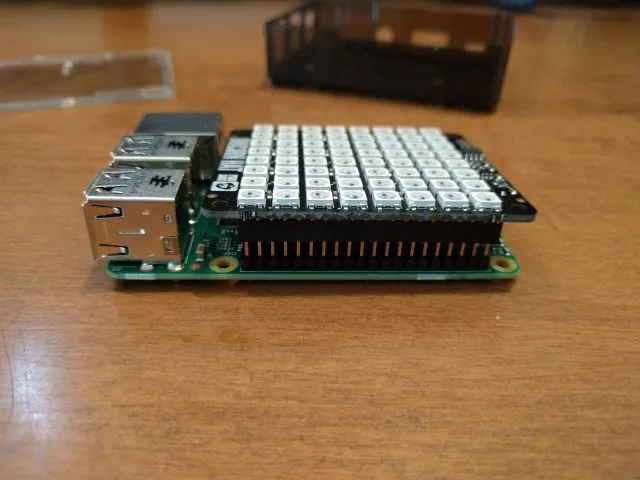
With the HAT properly positioned, push down gently to seat the board securely on the Raspberry Pi as shown in Figure 3.
Right now, the HAT is floating free over the Pi, connected only through the header pins. Since the whole contraption will be sealed in a case, I didn't feel the need to mount the HAT any more securely, but you may want to. Adafruit sells a set of spacers (https://adafruit.com/products/2336) you can use to secure the other side of the HAT against the Pi.
Next, install the Pi and HAT in the case as shown in Figure 4, then attach the cover (not shown).
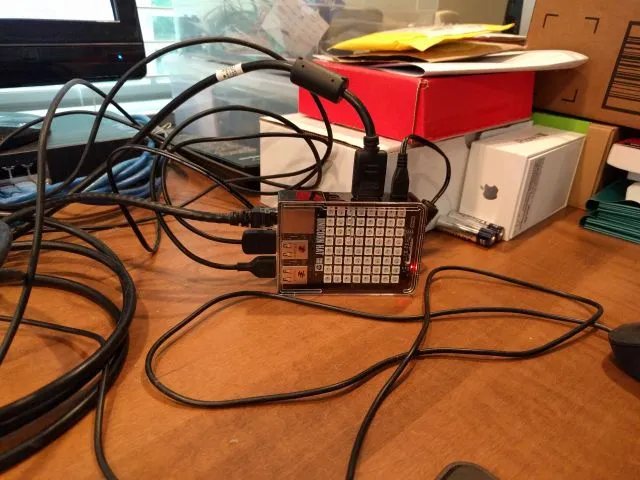
At this point, the hardware is all installed and ready to go. When finished, the Pi will only need network and power connections, but for the remainder of the setup process, you're going to need a display (monitor), keyboard, and mouse. Connect those components to the Pi as shown in Figure 5. Don't connect power, you have some more work to do before you can do that.
Setting Up the Raspberry Pi
The Raspberry PI needs an OS to boot, so grab Micro SD card then follow the instructions at https://raspberrypi.org/documentation/installation/installing-images/README.md to download and install the OS on the SD card. Once that's completed, insert the SD card in the Pi.
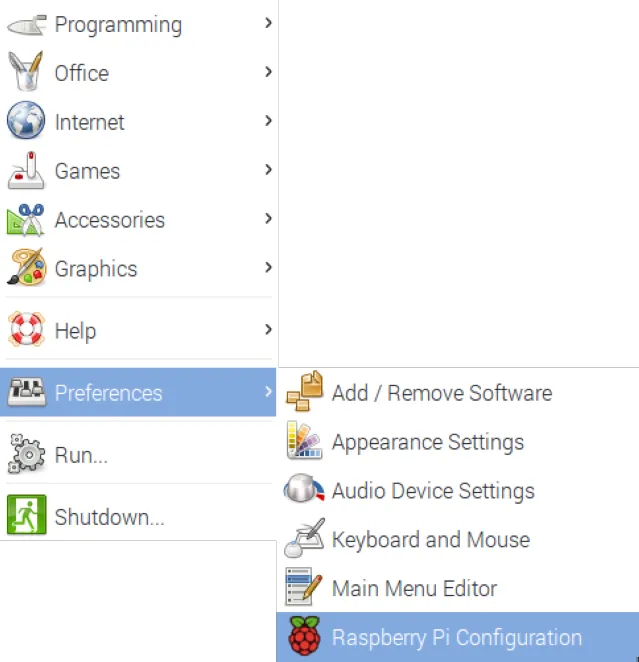
At this point, you're ready to power up the Pi. Turn on your monitor then plug the power supply into a power outlet and the Micro USB port on the Pi (upper right corner of the Pi shown in Figure 5). You have a few steps to perform. The first step is to configure some system-wide settings on the Raspberry Pi. You could get away without doing this, but you may run into problems later if you don't compete these steps. To start, open the Raspberry menu in the upper left corner of the Pi screen. In the menu that appears, select Preferences then select Raspberry Pi Configuration as shown in Figure 6.
By default, the default Raspbian image only utilizes a part of the SD card's storage (3 GB); if the SD Card you used for your Raspbian installation is larger than 3 GB, you'll need to expand the file system to use the whole disk. If you don't do this, your Pi's storage system may not have enough room to install of the additional software this project utilizes. (editor note: It seems like later versions of Raspbian do this automatically, but you'd better check).
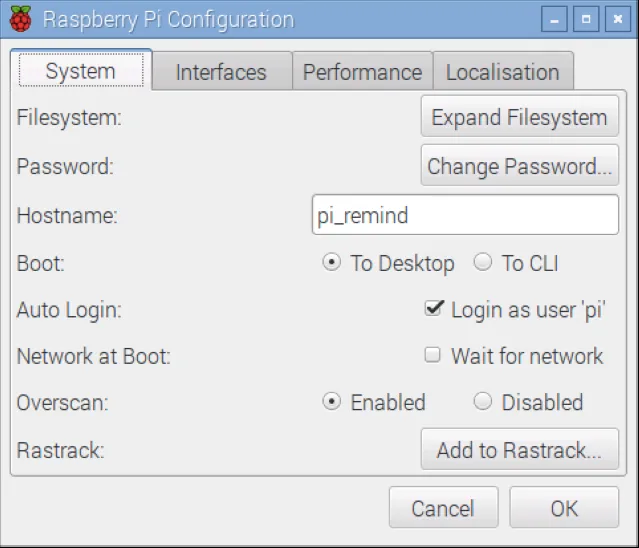
In the Raspberry Pi Configuration utility shown in Figure 7, click the Expand Filesystem button to enable the Pi to use the whole SD card for storage. Making this change will require rebooting your Pi, so don't be surprised when you're prompted to do so.
If you want, use this opportunity to change the host name for the Pi device. In Figure 7 you can see that I've named mine pi_remind so I can easily find the device on the network later. If you're a UK-based reader, you're done, click the OK button and let the Pi reboot. The Pi comes pre-configured for UK keyboard and other locale settings, so you're good to go.
As a US-based hacker, I find that the default settings don't work for me. Switch to the Localization tab and check all of the settings exposed there to ensure its properly configured for your locale, time zone and keyboard settings. Click the OK button when you're done to save your changes. Don't be surprised if you're prompted to reboot the Pi.
Next you'll need to update the Pi's core software and install some additional software needed to communicate with the Unicorn HAT and Google Calendar.
After the Pi reboots, open a terminal window and issue the following command:
sudo apt-get updateThis command will update the Pi's local repository of software update repositories. When the command completes, issue the following command in the same terminal window:
sudo apt-get upgradeThis updates the Raspbian OS and associated programs to the latest version. This process will take quite a while, but the benefit is that at the end of the process, your Pi is running the latest and greatest supported version of all apps and code for the device.
Note: When it comes to writing code, the Raspberry Pi is too slow and the available screen resolution is too small for me to work effectively. For that reason, I prefer to code on my desktop and upload the code to the Pi for testing. I coded the Python app for this project using the PyCharm IDE. The commercial version of the IDE enables me to remotely deploy the app to the pi device; you can read how I did it here: WebStorm Development on the Raspberry Pi. In order to be able to push code updates to the Pi, you'll need to figure out the Pi's IP address, the referenced article has instructions on how to do so. To simplify this on your home network, you may want to set a static IP address on the Pi so the IP address won't change if you switch routers or network providers.
Installing Required Python Modules
The Unicorn HAT uses its own python libraries; details can be found on the Pimoroni web site at https://learn.pimoroni.com/tutorial/unicorn-hat/getting-started-with-unicorn-hat. To install the libraries on the Pi, open a terminal window and execute the following command:
sudo curl -sS get.pimoroni.com/unicornhat | bashDuring installation, you'll be asked whether you want to also install sample code and additional software; this project doesn't make use of any of them, but you can install them just to see what else they give you.
Next, you'll need to install the Google Calendar API client code. You can find complete instructions at https://developers.google.com/api-client-library/python/start/installation. Basically just open a terminal window and execute the following command:
sudo pip install --upgrade google-api-python-client python-dateutil pytzFinally, there's a set of scientific libraries that are used in some of the Unicorn HAT code in the project, so you will need to install them using the following command:
sudo apt-get install python-numpyDownloading the Project's Code
The project's Python source code is available at https://github.com/johnwargo/pi_remind. You can clone the files using Git or download the files using a browser then extract the files to a folder on the Pi's file system. When I setup the project for the first time, I opened a new terminal window (to make sure I was pointing to the pi user's home folder) and executed the following commands:
mkdir pi_remind
cd pi_remind
wget https://github.com/johnwargo/pi_remind/archive/master.zip   unzip -j master.zip
This creates a folder for the project's code then pulls down the files and extracts the files to the folder. When everything finishes, you should see a file called remind.py (along with some other files) in the folder. Make note of the folder location you used for the project files, you'll need the folder path later.
Configuring Access to Google Calendar
Before the project's software can access your Google Calendar, you need to setup a developer account with Google (if you don't already have one) and define an application in the Google Developer Console that makes use of the Google Calendar APIs. Start by opening a browser window and navigating to https://console.developers.google.com. Login or create an account then look for the developer console shown in Figure 8.
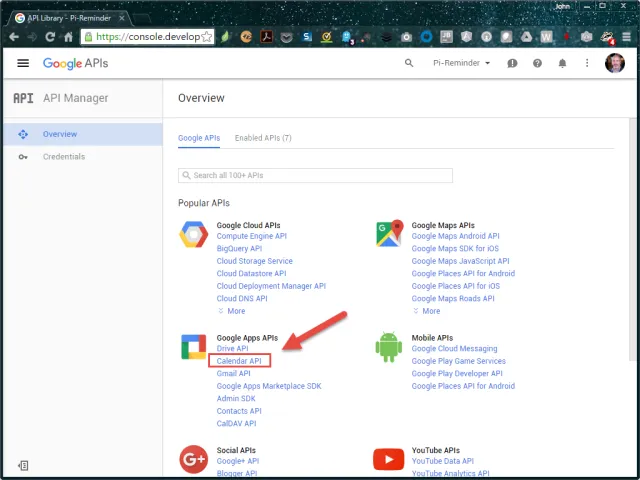
Click the link for Calendar API highlighted in the figure and Enable the API then define an application for this project. Once that's done, you'll need to create credentials for your project as shown in Figure 9.
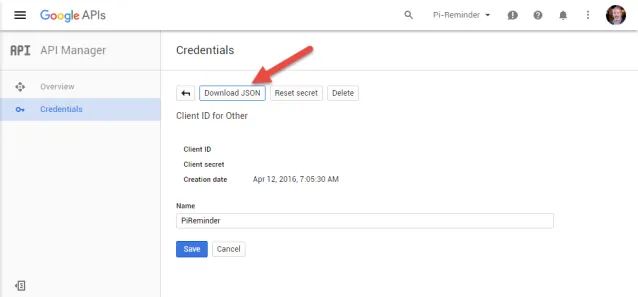
Once your credentials are ready, click the Download JSON button highlighted in the figure. Download the file to the folder where you extracted the python project files in the previous section (in my example, it's the pi user's home folder in a subfolder called pi_remind (/home/pi/pi_remind)). When you save the file, Google will automatically assign a long file name including the unique identifier for the project. For this project, save the file with the file name client_secret.json.
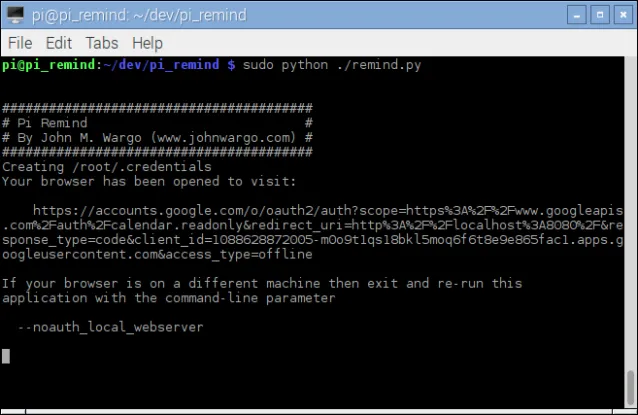
With the client secret file in place, you'll have to authorize the Pi to access your calendar. Open a terminal window, navigate to the folder where you extracted the project files and issue the following command:
sudo python ./remind.pyUsing the folder example from earlier, you would issue the following commands:
cd pi_remind
sudo python ./remind.py
If everything is setup correctly, the python code will execute and show a screen similar to the one shown in Figure 10.
At this point, the application will open the default browser and display the page shown in Figure 11.
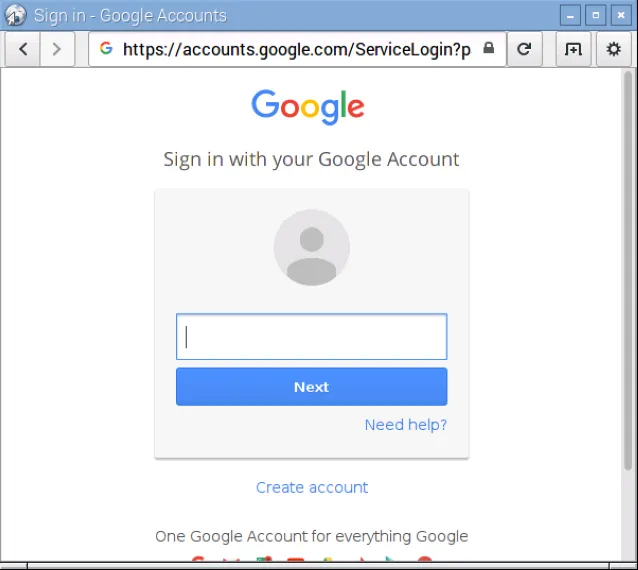
Login to your Google account and click the Next button. If you're like me, you probably have multiple Google accounts, so be sure to provide the email address for your primary Google Calendar account.
After you provide your password, the browser will prompt you to authorize the project's Python application to access your calendar as shown in Figure 12. The application name, Pi Reminder in this case, will be the same one you created in the Google Developer Console just a few steps back.

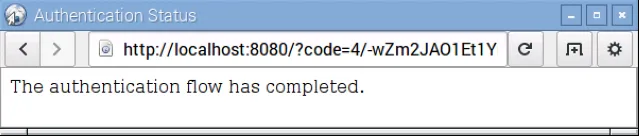
After you complete the authentication process, the browser will display a page similar to the one shown in Figure 13. At this point you can close the browser window.
The python application may quit after the authentication process completes, so you may have to restart the python application by executing the following command:
sudo python ./remind.py
The easiest way to execute the command again is to simply press the keyboard's up arrow key and the previous command should pop onto the command line for you to execute.
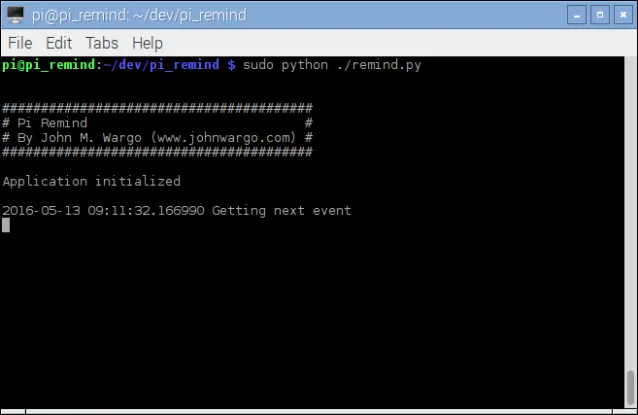
At this point, the application should connect to the authorized calendar and start checking for appointments as shown in Figure 14. To see a video of the app in action, see: https://youtu.be/X111pAaEP-kExecuting the Reminder Code for the First Time.
Configuring Auto Startup
There are a few steps you must complete to configure the Raspberry Pi so it executes the the remind app on startup. You can read more about this here: Autostart Python App on Raspberry Pi in a Terminal Window Executing the Reminder Code for the First Time.
Note: Don't forget to authorize the Google Calendar API to access your Google Calendar by running the manual startup process described in the previous session before enabling autostart.
If you don't already have a terminal window open, open one then navigate to the folder where you extracted the project files. Make the project's bash script files executable by executing the following command:
chmod +x start-remind.shNext, you'll need to open the pi user's session autostart file using the following command:
sudo nano ~/.config/lxsession/LXDE-pi/autostartAdd the following lines to the end (bottom) of the file:
@lxterminal -e /home/pi/pi_remind/start-remind.shTo save your changes, press ctrl-o then press the Enter key. Next, press ctrl-x to exit the nano application.
Reboot the Raspberry Pi; when it restarts, the python remind process should execute in its own terminal window.
Another option is to copy the project's start-remind.desktop file to~/.config/autostart. Reboot the Pi and you should see a terminal window running the Reminder app.
Customizing the Python Application
Now, when implementing this, I just used a simple flashing pattern that lit all of the LEDs using a single color. That's not very exciting as you'll likely see when you get this project up and running. The Unicorn HAT sample Python code found at https://github.com/pimoroni/unicorn-hat/tree/master/python/examples has code you can switch into the app in order to make the lights flash more interestingly.
Right now, the code is as simple as I could make it. When the Pi checks for calendar entries, it doesn't check to see if the appointment has a reminder set. For some placeholder appointments or less important appointments, you might not want to be reminded. So, one enhancement I plan on making is to check the appointment to see if I need alerting. Perhaps I'll code that and add it to the project on GitHub.
Next and/or Previous Posts
<< AT&T IoT Starter Kit Getting Started Guide All Things Open 2016 >>
Header image: Photo by Harrison Broadbent on Unsplash