 John M. Wargo
WebStorm Development on the Raspberry Pi

Posted: February 10, 2016 | | Categories: Raspberry Pi, Internet of Things (IoT)
I've been working on a Particle Photon-powered garage door opener project with my son; I'd found an example project online somewhere (I can't remember where, otherwise I'd post a link here) and looked pretty interesting. I, of course, modified it and put my own twist on the project. I'll write about the project once it's completed. The project's pretty simple and it's all ready to assemble (plus the code is all written).
I came up with a few features I wanted for the opener that I couldn't implement on the Photon, so I decided to do a V2 on the Raspberry Pi. I've got the hardware all figured out and I wanted to create a node-based server process running on the Pi to control everything. I love working with the Pi, but I honestly don't want to write code on it. The editors I'm comfortable with aren't compatible and the system's just not fast enough for the dev stuff I want to do. So, for this server project, I started thinking of how I could use my PC to code everything, but also maintain a quick and easy way to publish code to the Pi for execution and testing.
My JavaScript/Node editor of choice is WebStorm from JetBrains, so my plan was to code in WebStorm then transmit the files to the Pi. Once that was in place, I needed a quick way to restart my code so the new version of the server was available for testing. One thought was to use GitHub as an intermediary for this, but that seemed slow and clunky. Next I figured I could use FTP to post the files to the Pi. Thinking that manually FTPing the files to the Pi would be a pain, I started looking at what WebStorm could do. It turns out that WebStorm supports SSH, so I was able to quickly setup a publishing target in WebStorm that allowed me to easily deploy changes to the Pi.
What follows are instructions on how to setup WebStorm to publish code directly to the Pi.
Implementation – Enabling SSH
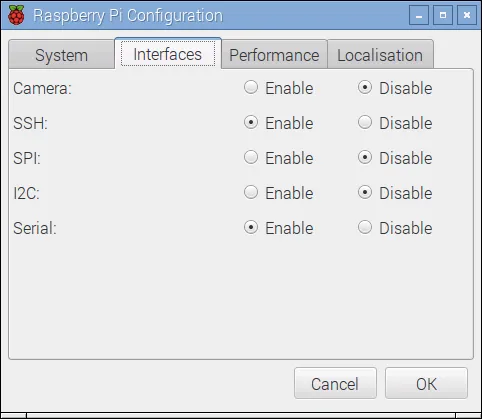
The first step in the process is to enable SSH on the Pi. It's fairly easy to do this, simply open the Raspberry Pi Configuration utility (open the Pi menu and select Preferences, then Raspberry Pi Configuration). In the dialog that appears (Figure 1), select the Interfaces tab then enable SSH as shown in the figure. When you click the OK button, the Pi will reboot with SSH enabled.
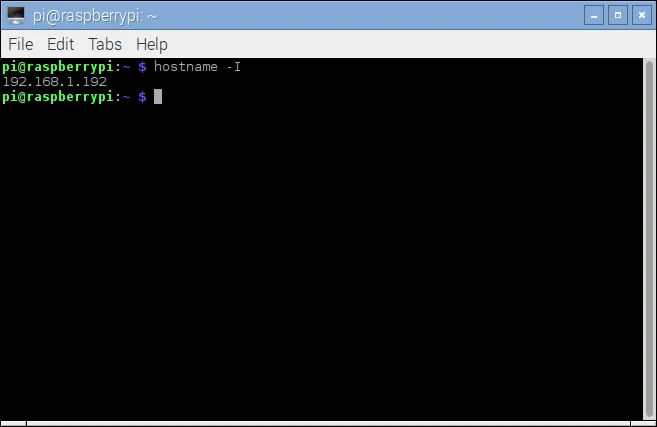
The next thing you need to do is figure out how your desktop development environment will connect to the Pi. WebStorm needs to know how to reach the Pi; you could enable DNS and use the Pi's name to connect to it, but that's more complicated than I wanted for this project. Instead, I decided to connect to the Pi using the device's IP address. There are several ways to determine the Pi's IP address. A quick look at the Pi documentation told me I could use the following command to determine the IP address:
hostname -ISo, I opened a terminal window on the Pi and typed in the command and received the results shown in Figure 2. The first time I did this (OK, it was a couple of times) I didn't get the results I wanted. I'd type in the command, but I'd get back an IP address of 127.0.1.1 which is a local address (only accessible from the PI) and something that wouldn't work for me. I finally figured out the problem, I used a lower case i and that got me completely different results.
Another way to get the IP address is to execute the following terminal command:
sudo ifconfigWith this command, you get the results shown in Figure 3.
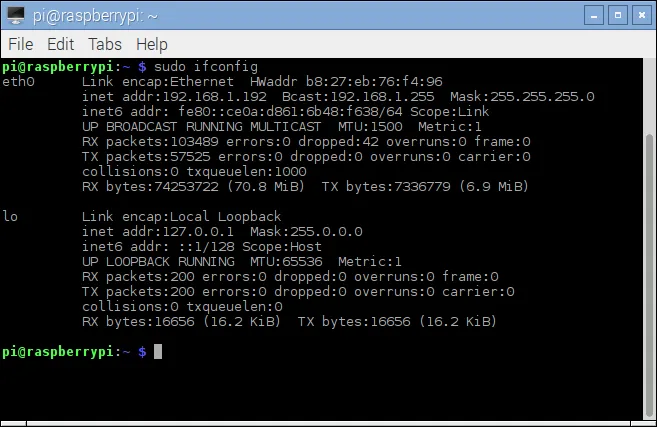
Using either approach, I quickly determined my device's IP address (192.168.1.92). With that in place, I'm ready to configure WebStorm.
Configuring WebStorm
Now that I know how to reach my Pi and the SSH software is installed, it's time to configure my WebStorm project to publish my code to it. In WebStorm, open the Tools menu, select Deployment then Configuration; you should see a dialog similar to the one shown in Figure 4.
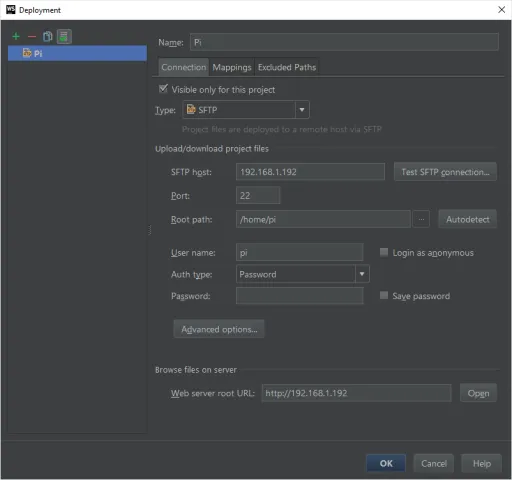
The first thing you'll want to do is click the green plus sign in the upper-left corner of the dialog. By clicking on it, you're instructing WebStorm to create a new connection. When the new connection appears (it will take up the right side of the dialog as shown in the figure), do the following:
- Set the connection type to SFTP as shown in the figure.
- Specify the Pi's IP address as the SFTP host.
- Leave port alone; port 22 is the default port for SSH and the Raspberry Pi will use it by default.
- For Root Path, you can type in the full path pointing to the Pi user's home folder if you know what it is. I didn't know, so I clicked the Autodetect button and it filled it in for me.
- Specify the User name defined on the Pi. The default user name is “pi” and the default password is “raspberry” – if you've changed the default user settings on the Pi, make sure you enter the correct values here. Set Auth type to Password as shown in the figure.
- Be sure to check the Save password checkbox if you don't want to have to type in the password every time you deploy your code to the Pi.
- At this point, you should have everything you need to connect – click the Test SFTP connection button to validate the settings you've entered. If the test fails, you'll have to tweak the settings until everything's right.
Once you've validated the connection, switch over to the Mappings tab shown in Figure 5.
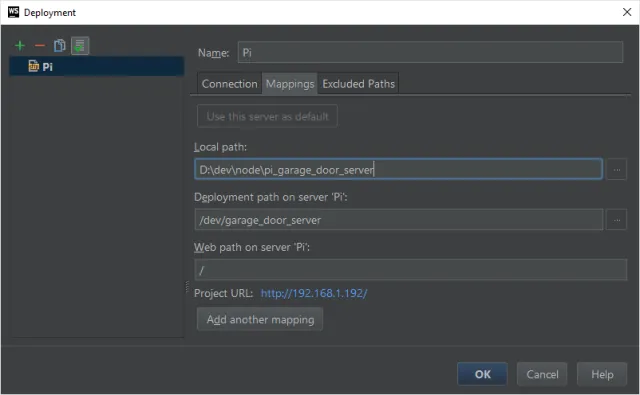
The Local path field should be populated with your current WebStorm project folder. This field specifies the source folder for the deployment.
In the Deployment path on server 'Pi' field, enter the home folder path where you want the files deployed. For my configuration, the user's home folder is located in /home/pi, so with the deployment path shown in the figure, the files will be deployed to /home/pi/dev/pi_garage_door_server.
There will be files/folders in my project's source folder that I don't want copied over to the Pi, do I used the Excluded Paths tab to specify the content I wanted excluded as shown in Figure 6.
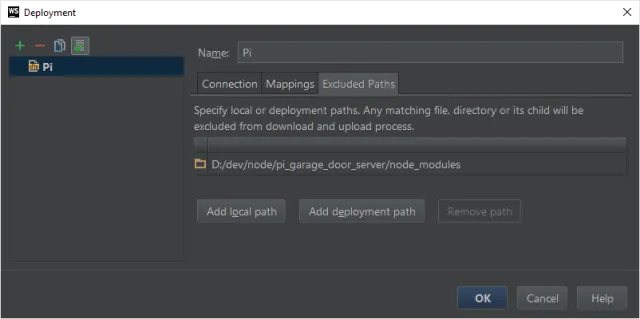
In this case, I wanted to be able to manually install any modules I needed on the Pi, rather than using the ones from my dev environment. I clicked the Add local path button and selected the node_modules folder from my project.
Click the OK button when finished.
Deploying the Project Files
With everything in place, you can deploy the project files to the Pi in two ways:
- Open the WebStorm Tools menu, select Deployment then the Upload to Pi option
- Right-click on the project folder in WebStorm then, in the pop-up menu that appears, select Deployment then the Upload to Pi option
WebStorm will open a File transfer window and show you the status of the file transfer as it progresses.
Conclusion
That's it, that's all there is to configuring WebStorm to deploy files to the Raspberry Pi. To test my code, I'll need to keep a SSH window open, connected to the Pi, to execute the server code. Ultimately, when the code's stable, I will configure my server to reload itself after every execution, so all I'll have to do is refresh my browser window twice to load the new code I've deployed. More on the server process later. Enjoy!
Next and/or Previous Posts
<< BlackBerry Development Fundamentals Website Retired What's Wrong With Trolling >>
Header image: Photo by Harrison Broadbent on Unsplash