 John M. Wargo
9-Patch Files for Ionic Capacitor Apps

Posted: November 13, 2019 | | Categories: Mobile Development
Links On This Page
I've been working on my first app store app; it's an app that, I think, is pretty unique. I'm submitting the app to the Android app store this week and will add the iOS version sometime before the end of the year. The application is an Ionic app and I really enjoyed writing it.
As I completed the app, I had one lingering bug that I just couldn't squash. I sought help on the Ionic Forums, but eventually hired Josh Morony to help me figure it out. I learned Ionic development from Josh's book and tutorials, and he was very helpful, but he wasn't able to help me squash that bug. I eventually figured it out with the help of Mike Hartington from the Ionic team figured it out. Thanks Mike!
With the bug squashed, it was time to start thinking of putting the finishing touches on the app's UI, and that meant adding a splash screen to the app. I hired rupindersingh on Fiverr to design an icon and splash screen for me but on the Android app the splash screen just didn't look right. Android uses 9-patch files to create a dynamically expandable splash screen image but I just couldn't figure out how to make one (the docs for the 9-patch tools in Android Studio are light, very light). I reached out to Josh Morony and asked for more help. He said that he'd been wanting to figure out how to work with splash screens on Ionic Capacitor and offered to figure it out and publish a blog post about it; you can find the resulting blog post here.
Well, Josh's article got me to where I needed to be – the splash screen works perfect on Android/Capacitor now. However, I really struggled with Josh's 9-patch instructions – with his help, I was able to figure it out, but it just wasn't easy. With that in mind, I took Josh's article and updated it with my learnings and sent it to him so he could update his article with the additional information I learned. In response, he said “Thanks for taking the time to share your experience, I'll review your edits and incorporate them in a new version of the article when I have some time.”
It's been four months and I haven't seen an updated to Josh's article yet, so I decided to go ahead and publish mine. I really appreciate Josh's help and the article he published clearly helped me get over the hump and got my splash screen working. I just think developers need more information about how to create 9-patch files. With that in mind, here's my version of the 9-patch article with Credit to Josh for his help.
The 9-Patch File
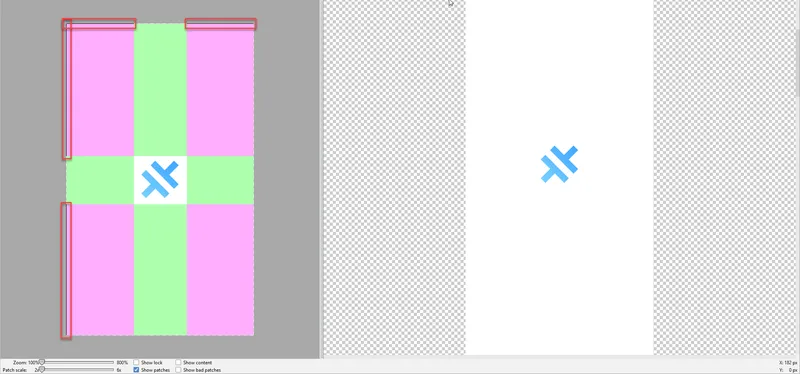
A 9-Patch file is a special type of image that has an extra 1px border all the way around the original image. Within this 1px border, you set individual pixels either black or transparent to instruct how the image should be stretched by the device at runtime. When the Android OS renders the image, it deletes (or hides, who knows) those black pixels and stretches that image area as needed to properly display the image on the screen.
For example, in the following figure you can see how the highlighted areas have black pixels set, indicating that those are the parts of the image that stretch to accommodate the device's screen resolution. By marking sections on the top and left border with black pixels, we can indicate the sections that we want to be stretched to fit the required screen dimensions (these sections are shown in pink).
All you need to a create a 9-patch file is an application that can add that 1-pixel border to the image file and let you set, or clear, pixels in that border to create the stretched image you need. I looked around and didn't find any image editors that supported 9-patch files out of the box, but here are some articles that show how to do it in PhotoShop. The good news is that Android Studio can create the files for you automatically (but instructions for how to do so are fairly useless).
You can also add black pixels on the right and bottom border, but this does not define the area to be stretched. This defines the area to be “filled”, which is not required in our case for splash screens.
Creating 9-Patch Files
At this point, follow Josh's instructions for creating the necessary image files and configuring the Android project. Back in Android Studio, right-click on each of the new splash screen files and choose Create 9-Patch File.... When prompted, save these new files in the same folder as the original splash screen and keep the splash.9.png name Android Studio uses by default.
Once you complete the adjustments to the new 9-Patch files (covered in the next section), you can delete the original splash screen files. If you leave them there, you'll get an error during build, so you do have to delete them, but not now. Android Studio has a nasty quirk that will cause you pain if you delete the original files now. Whenever you make a change to the file using Android Studio's 9-patch editor, the changes are immediately written to the file and there's no undo. So, in the next section when you're making changes, if you mess it up, you'll have to delete the 9-patch file and recreate it from the original, so that's why it makes sense to keep the original around for now.
The instructions that follow apply to a splash image with a centrally located logo in a field of solid color (like the current Capacitor logo). The process is basically the same for more sophisticated images, but the results may differ based on the complexity of your image.
Note: Remember, Android Studio automatically saves everything you do here, with no undo, so be prepared to make a bunch of mistakes and recreate your work repeatedly until you get it right.
In Android Studio, double-click on one of the new 9-Patch files, Studio will open an editor like the one shown in the earlier figure.
Now, using the following figure as a guide, follow the steps below.
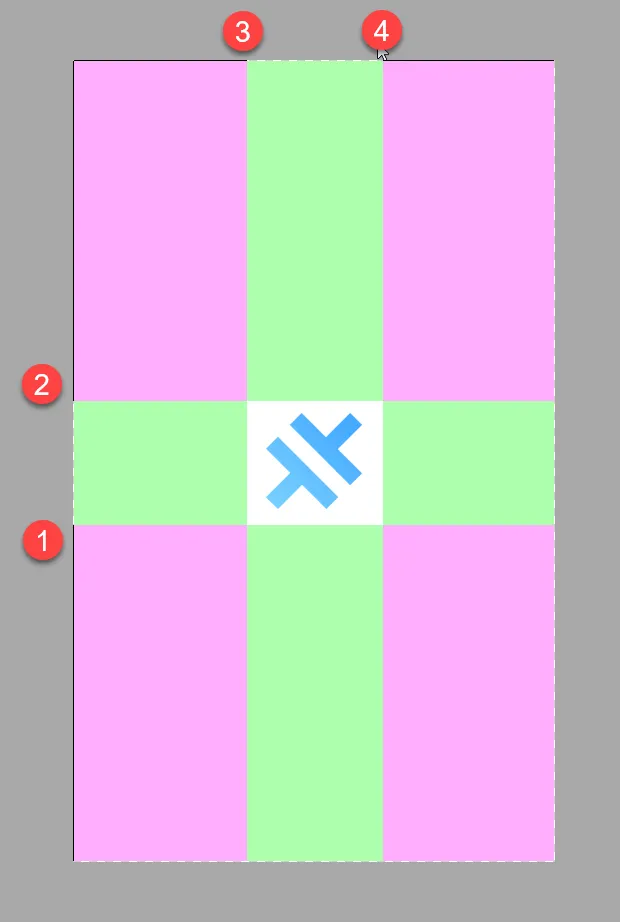
- In the editor, enable the Show patches checkbox so you can more easily see your work.
- Place your mouse at position 1, then click and drag (holding the mouse button down) into the left side of the image. Once the mouse enters the image, drag it down (staying in the image) past the bottom of the image, then release the mouse button.
- The editor highlights the width of the image in grey starting where your mouse hit the image all the way down to the bottom. When you release the mouse button, it highlights part of the area in pink with black pixels marked in the left margin. If the top portion of the marked area covers part of the logo – place your mouse over the left side of the image, right where the highlighted area starts, and a handle should appear you can use to reposition the top of the highlighted area so it doesn't cover the logo.
- Next, place your mouse at position 2 then click and drag into the image. Once you're inside, keep the mouse button down and (staying in the image) drag up over the top of the image then release the mouse button. You should now see a pink highlighted area at the top of the image as well (with black pixels in the margin matching the highlighted area).
- Are you starting to see a pattern yet? Place the mouse at position 3 then click and drag down into the image. Once you're inside, keep the mouse button down and (staying in the image) drag the mouse left, over the left border of the image then release the mouse button. You should now see a pink highlighted area at the top left of the image as well (with black pixels in the top margin matching the new highlighted area).
- Finally, Place the mouse at position 4 then click and drag down into the image. Once you're inside, keep the mouse button down and (staying in the image) drag the mouse right, over the right border of the image then release the mouse button. You should now see a pink highlighted area at the top-right of the image as well (with black pixels in the top margin matching the new highlighted area).
- That's it, that's all you must do. Use the handles to adjust the highlighted areas so the central logo is evenly bracketed by the pink areas. On the right of the editor, Android Studio displays multiple copies of the stretched image so you can quickly see how each change you make affects the different orientations. Studio has some problem with scale for larger images, so you may have to scroll the window to see all the samples.
In the end, you want some black pixels on the top and left, indicating the stretched areas - there shouldn't be any black pixels on the right or bottom sides of the image.
If you do all this work, and think you got it right, but Android Studio complains with the following error during the build process:
Android resource compilation failed

error: too many padding sections on bottom border.

D:\dev\projects\time-slicer\ionic\android\app\src\main\res\drawable-xxhdpi\splash.9.png: error: file failed to compile.
Here's what happened: as you dragged handles around trying to get the image just right, you may have inadvertently left some remnants that Android Studio isn't rendering properly for you. Switch to an image editing application and open the image, if you see more black pixels than Android Studio shows in the 9-patch editor, either use the image editing application to remove all the errant pixels, or delete the 9-patch file and start over.
Next and/or Previous Posts
<< Introducing the Time Slicer App Learning Progressive Web Apps Cover >>