 John M. Wargo
Arduino ESP32 Web Server on a Processor Core

Posted: August 27, 2023 | | Categories: Internet of Things (IoT), Arduino, ESP32
Links On This Page
- Arduino ESP32 Running Tasks On Multiple Cores
- Seeed Studio Xiao
- Adafruit 5x5 NeoPixel Grid BFF Add-On for QT Py and Xiao
- Glowing Pumpkin Xiao 5x5 BFF
- Glowing Pumpkin Xiao 5x5 BFF Server
- No More Mixed Messages About HTTPS
- Cross-Origin Resource Sharing (CORS)
- WiFi Web Server
- Arduino-ESP32 WebServer library
- Multicast DNS (ESPmDNS)
- `index.html` file
- Pumpkin LED Controller
- Netlify
- https://pumpkin-controller.netlify.app/
- Accessing an Arduino ESP32 Web Server
I wrote the Arduino ESP32 Running Tasks On Multiple Cores post I published earlier this week so I could publish this one.
Years ago I published a several Glowing Pumpkin projects: Arduino Glowing Pumpkin and Arduino Glowing Pumpkin (Adafruit Feather). Both of them used Arduino compatible devices plus either one of the Adafruit multi-NeoPixel devices or a NeoPixel shield.
I always wanted to redo this project, especially using some of the smaller ESP32 devices like the Seeed Studio Xiao series of microcontrollers and some of the smaller NeoPixel matrixes like the Adafruit 5x5 NeoPixel Grid BFF Add-On for QT Py and Xiao. Because of this, I recently published a refresh in Glowing Pumpkin Xiao 5x5 BFF.
With that project in the can (a movie-making term) I started thinking about what else I could do with it. I quickly realized that I could enhance the project by adding a web server and letting a user remotely control the pumpkin illuminating hardware using a web browser or mobile app. I agree that that's not the most interesting use case, but I figured I'd use what I learned about splitting tasks across multiple ESP32 processor cores to run a web server on one of the cores while the other one does something else.
This article explains how I did it. If you want to skip the explanation all together and jump to the code, you can find the complete project code at Glowing Pumpkin Xiao 5x5 BFF Server.
The API
For this project, I have this Arduino compatible Microcontroller with a 5x5 NeoPixel matrix strapped to its back residing NeoPixels facing up inside a theoretical carved pumpkin. What would I want to be able to do with this thing?
Assuming the following NeoPixel configuration:
int numColors = 6;
uint32_t colors[] = { CRGB::Blue, CRGB::Green, CRGB::Orange, CRGB::Purple, CRGB::Red, CRGB::Yellow };
CRGB leds[NUM_LEDS];
I came up with the following API:
| Method | Description |
|---|---|
/color:# | Lights all of the NeoPixels with a specific color. The command accepts a single parameter, the array index for the selected color. So, for example, to illuminate all of the LEDs Purple, the command is color:3 as Purple is the 4th color in the array (with an index of 3 since C arrays start at 0). To illuminate the LEDs Blue, the command is color:0. |
/flash:#:# | Flash the LED matrix a specific color a specific number of times. For example, to flash the LED matrix Blue three times, the command is flash:0:3. |
/lightning | Flash the LED matrix White a random number of times for a random amount of time for each flash in an attempt to simulate lightning or electrical flashes inside the pumpkin. |
/off | Turns off the LED Matrix (sets all NeoPixels to CRGB::Black). |
/random | Enables random mode where the ESP32 device randomly picks a color from the array and displays it for a random amount of time (seconds) before picking another color and starting all over again. |
CORS Impact
Before I get too far into this post I have to warn you about something.
Even though you can run a Web Server on an Arduino device and have it process requests, it doesn't mean that you can access the web server from any device anywhere. The Internet, well, really mostly Google, conspires against you and will block responses from the web server in several scenarios.
Yeah, I know, right?
Anyways, back in 2019 Google got serious about HTTPS requests vs. HTTP; you can read about it in No More Mixed Messages About HTTPS. With this, Google started preferring HTTPS connections (while still allowing HTTP connections) but eventually started blocking HTTP connections all together.
There's also this thing called Cross-Origin Resource Sharing (CORS) that tries to help secure connections between a browser and a server. The web application has to enable CORS (which basically means adding some headers to the request) in order to be able to make a request to the server and the server must respond in kind (with the right headers). Even if you setup CORS correctly, the browser will block responses from our tiny little web server unless:
- The web server and the system running the browser are running on the same local network.
- You use some other application other than a browser to connect to the web server.
- You're using an Internet-hosted web application, but set some special settings that allow the browser to connect to the server and accept responses from it.
I know, it's a pain in the @ss.
So, for this post, I cover the web server code in detail; in the following article I'll explain all the options for accessing the web server from a variety of devices and tools. I apologize for that, but this article is going to be pretty big without me covering all options.
As you look through the code for the web server, in most of the request handlers you'll see the following in the code:
// Only accept GET requests, this addresses a problem caused by
// CORS preflight check requests that the web server library
// doesn't deal with correctly (OK, not at all)
if (server.method() != HTTP_GET) return;
The code exits the function if the incoming request is not an HTTP GET request. I had to add this because with CORS enabled, the browser sends a pre-flight check request to the server first to see if it can handle the request. Only after the web server responds to that request will the browser send the actual request.
The side-effect of this is that the server received and processed two requests for every one sent by the web application. It wasn't until I started looking at the request type and noticing I got two different requests that I realized what was happening. Ignoring the first request works, I'm not sure why. Another option to use is to send a 200 response to the first request (the pre-flight check request), and that should work as well.
Core 1
In this project, the web server runs on core 0. I'll get to that code in a minute, but lets talk about the other core, what code it runs.
Core 1 has an easy job, all it has to do is check to see if Random is enabled then, if it is enabled, pick a color and update the NeoPixel matrix with that color.
void Task1code(void* pvParameters) {
  int randomInt;

  Serial.print("LED Management running on core ");
  Serial.println(xPortGetCoreID());

  // Repeat the following infinitely
  for (;;) {
    if (doRandom) {
      randomInt = (int)random(1, numColors + 1);
      fadeColor(colors[randomInt]);
    }
    // Add a small delay to let the watchdog process
    //https://stackoverflow.com/questions/66278271/task-watchdog-got-triggered-the-tasks-did-not-reset-the-watchdog-in-time
    delay(25);
  }
}
While this isn't an amazing example of splitting tasks across two processor cores, by splitting this task off to its own processor, the random color process runs smoothly - no matter what the web server is doing. A much better example would be two processor intensive tasks running simultaneously on separate cores but I don't have that example handy. This is all I have to share with you.
My First Web Server Attempt
The web server runs as the Task0 task as described in my previous post. The web server and all the actions it takes runs on the ESP32 processor core 0.
The Arduino platform's Wi-Fi library includes a rudimentary WiFi Web Server, so I decided to start there. Using what I learned in the previous post (Arduino ESP32 Running Tasks On Multiple Cores), I created a new Arduino project, configured the sketch to connect to my Wi-Fi network, then configured a web server on an ESP32's first core (Core 0) using the web server tutorial linked at the top of the paragraph. The web server code looked like this:
String request, searchStr;
int color, colorPos, count;

WebServer server(80);

void Task0code(void* pvParameters) {

  Serial.print("Web Server running on core ");
  Serial.println(xPortGetCoreID());

  // This is the worker code for the core, runs infinitely
  // listening for requests from the remote client
  for (;;) {
    request = "";                            // empty this to eliminate previous responses
    WiFiClient client = server.available();  // Listen for incoming clients
    if (client) {
      Serial.println("Client connection");
      while (client.connected()) {  // loop while the client's connected
        if (client.available()) {   // if there's bytes to read from the client,
          char c = client.read();   // read a byte, then
          request += c;             // append it to the response variable

          if (c == '\n') {
            Serial.println(request);

            // Color command
            searchStr = "GET /color:";
            colorPos = searchStr.length();
            if (request.indexOf(searchStr) >= 0) {
              // subtracts '0' from it to get the integer representation of the number
              color = request.charAt(colorPos) - '0';
              Serial.print("Set Color #");
              Serial.println(color);

              if (color > numColors - 1) {  // invalid color idx
                allOff();
                error(client);
                break;
              }

              disableRandom();
              fadeColor(colors[color]);
              success(client);
              break;
            }

            // FLash command
            searchStr = "GET /flash:";
            colorPos = searchStr.length();
            if (request.indexOf(searchStr) >= 0) {
              // subtracts '0' from it to get the integer representation of the number
              color = request.charAt(colorPos) - '0';
              // get the number of flashes
              count = request.charAt(colorPos + 2) - '0';
              Serial.print("Flash color #");
              Serial.print(color);
              Serial.print(", ");
              Serial.print(count);
              Serial.println(" times");

              if (color > numColors - 1) {  // invalid color idx
                allOff();
                error(client);
                break;
              }

              flashLEDs(colors[color], count);
              success(client);
              break;
            }

            // Lightning command
            if (request.indexOf("GET /lightning") >= 0) {
              Serial.println("Lightning");
              flicker();
              success(client);
              break;
            }

            // Off command
            if (request.indexOf("GET /off") >= 0) {
              Serial.println("Off");
              allOff();
              success(client);
              break;
            }

            // Random command
            if (request.indexOf("GET /random") >= 0) {
              Serial.println("Random");
              enableRandom();
              success(client);
              break;
            }
          }
        }
        delay(10);
      }
      client.stop();
      Serial.println("client disconnected");
    }
    // Add a small delay to let the watchdog process
    //https://stackoverflow.com/questions/66278271/task-watchdog-got-triggered-the-tasks-did-not-reset-the-watchdog-in-time
    delay(25);
  }
}
I'm not going to explain all the ins and outs of the code since it's not important because I abandoned this approach. If you look at the code, it's klunky. For example, to read the request, the sketch does the following:
// empty the previous request buffer to eliminate previous responses
request = "";
// Listen for incoming client requests
WiFiClient client = server.available();
if (client) {
  Serial.println("Client connection");
  while (client.connected()) {  // loop while the client's connected
    if (client.available()) {   // if there's bytes to read from the client,
      char c = client.read();   // read a byte, then
      request += c;             // append it to the response variable

      if (c == '\n') {
        // search through the line looking for one of the API commands

      }
  }
  client.stop();
  Serial.println("client disconnected");
}
The code reads requests character by character looking for a new line character (\n), next it must search the request line (each request could be multiple lines considering HTTP headers) by line until it sees a command it recognizes.
Next, I had to write a bunch of if/then statements to identify the different API commands and act accordingly. It's not beautiful code and I could have used functions to make it cleaner, but there has to be a better way. I quickly abandoned this approach.
A Better Web Server Approach
Poking around for an alternative to the standard arduino web server I found the Arduino-ESP32 WebServer library. This code is specific to the ESP32 but offers a much cleaner implementation plus it support CORS out of the box. Looking at the main server setup and request processing loop looks like this:
#include <ESPmDNS.h>
#include <WebServer.h>

#include <uri/UriBraces.h>

WebServer server(80);

void Task0code(void* pvParameters) {

  Serial.print("Web Server running on core ");
  Serial.println(xPortGetCoreID());

  if (MDNS.begin(HOSTNAME)) {
    displayMessage("MDNS responder started");
    MDNS.addService("http", "tcp", 80);
  } else {
    // It didn't work, so turn the LED Matrix Red
    // until someone notices (forever)
    displayMessage("Error setting up MDNS responder!");
    fadeColor(CRGB::Red);
    while (1) {
      delay(1000);
    }
  }

  server.enableCORS();
  server.on('/', handleRoot);
  server.on(UriBraces("/color:{}"), handleColor);
  server.on(UriBraces("/flash:{}"), handleFlash);
  server.on("/lightning", handleFlicker);
  server.on("/off", handleOff);
  server.on("/random", handleRandom);
  server.onNotFound(handleNotFound);
  server.begin();
  displayMessage("HTTP server started\n");

  for (;;) {
    server.handleClient();
    // Add a small delay to let the watchdog process
    //https://stackoverflow.com/questions/66278271/task-watchdog-got-triggered-the-tasks-did-not-reset-the-watchdog-in-time
    delay(25);
  }
}
Notice how it's a lot cleaner? It's a lot easier to maintain too. Lets dig into the code.
Core 0
First of all, the web server process runs on the ESP32 device's core 0. Since there's nothing executing in the sketch's main loop function, the core is dedicated to the web server process (more or less, that may not be 100% true, but close).
Multicast DNS
Next, the sketch uses the Multicast DNS (ESPmDNS) library to register a unique name for the device on the network. The code looks like this:
#define HOSTNAME "pumpkin"

if (MDNS.begin(HOSTNAME)) {
  displayMessage("MDNS responder started");
  MDNS.addService("http", "tcp", 80);
} else {
  displayMessage("Error setting up MDNS responder!");
  fadeColor(CRGB::Red);
  while (1) {
    delay(1000);
  }
}
What this code does is define a network device in DNS with the name pumpkin.local.
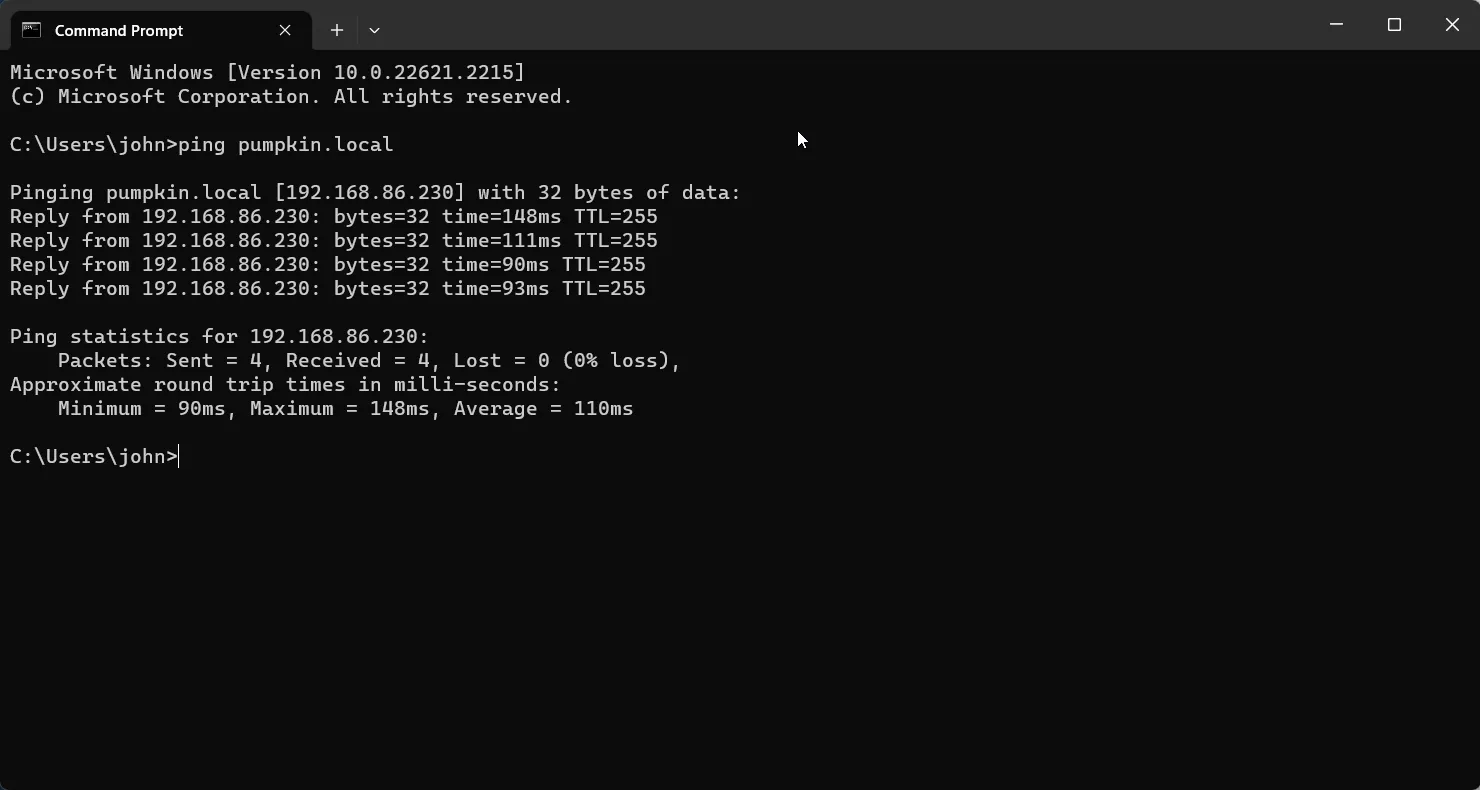
If I open a browser and type pumpkin.local in the address bar, the browser will connect to the web server running on the device and request the page at /. How cool is that? It even works with the ping command:
With this in place, any user trying to connect to the web server only needs the name for the device, nothing more. Without this, the user would have to determine the IP Address for the device (perhaps pulling it from the Serial Monitor while the sketch runs in the Arduino IDE) and type it in manually every time they wanted to use it.
You can change the local DNS name to whatever you want (within the rules of DNS naming), simply change the HOSTNAME value in the code.
Processing Client Requests
At this point, it's time to setup the Web Server code. In the example below, the sketch:
- Enables CORS so the web server automatically adds the needed headers to every response.
- Adds an event handler for root requests for the web server (
/'). - Adds event handlers for the different API commands (described above).
- Adds an event handler for requests that don't match any of the defined requests (404 - not found).
- Starts the server.
- Writes to the Serial Monitor letting the developer (me) know that the server started.
The server process has everything it needs to process any request it receives.
Here's the code that implements everything in that list:
server.enableCORS();
server.on('/', handleRoot);
server.on(UriBraces("/color:{}"), handleColor);
server.on(UriBraces("/flash:{}"), handleFlash);
server.on("/lightning", handleFlicker);
server.on("/off", handleOff);
server.on("/random", handleRandom);
server.onNotFound(handleNotFound);
server.begin();
displayMessage("HTTP server started\n");

for (;;) {
  server.handleClient();
  // Add a small delay to let the watchdog process
  //https://stackoverflow.com/questions/66278271/task-watchdog-got-triggered-the-tasks-did-not-reset-the-watchdog-in-time
  delay(25);
}
Handling Root Requests
As I mentioned at the start of this post, for this project I want to control the ESP32 device's LEDs from a browser. This means that I need to get a web application loaded into the browser that I can use to do that. The easiest way to do this is to have the web server host the web app used to control the LEDs. This is really simple to do, you create a handler event for requests to the web server's root page / like this:
server.on('/', handleRoot);Next you write the code that handles the request and returns a web page like this:
void handleRoot() {
  String webApp = "<html>";
  webApp += "<head><title>Pumpkin Controller</title>";
  webApp += "</head><body>";
  webApp += "<h1>Pumpkin Controller</h1>";
  webApp += "<p>Welcome to the pumpkin controller application.<p>";
  webApp += "</body></html>";
  server.send(200, "text/html", webApp);
}
This sends the following page to the browser:
<html>
  <head>
    <title>Pumpkin Controller</title>
  </head>
  <body>
    <h1>Pumpkin Controller</h1>
    <p>Welcome to the pumpkin controller application.<p>
  </body>
</html>
Pretty cool, right? Unfortunately, the web app for this project is pretty big; the index.html file is more than 4,500 characters and the app uses a bunch of JavaScript code to send commands to the remote device and process the response. I could serve all of this code from the tiny web server but it would be a lot of code and very slow. There's a better way!
For this project, I built the Pumpkin LED Controller application, then published it using Netlify. Netlify allows you to publish web apps for free if they're Open Source projects as this one is. They even give you a secure URL to access the web app from (without having to buy a custom domain); in this case its https://pumpkin-controller.netlify.app/.
So now I have a fully functional web application hosted for fast delivery, how do I get the app to users? Well, instead of hosting the entire app on our tiny little web server, I instead hosted a very small web app that redirects users to my Netlify hosted app. The web application needs to know the IP address of the ESP32 device, so I added some code that passes the IP Address to the web app which allows for self configuration (no typing in the remote device's IP address). Let me show you how this works...
Here's the code in my project that handles requests made to the web server root (/):
void handleRoot() {
  displayMessage("Root (/)\n");
  String redirectHTML = "<html>";
  redirectHTML += "<head><title>Redirecting</title>";
  redirectHTML += "<meta http-equiv='Refresh' content=\"3; url='https://pumpkin-controller.netlify.app?" + WiFi.localIP().toString() + "'\" />";
  redirectHTML += "<link rel='stylesheet' href='https://unpkg.com/mvp.css'>";
  redirectHTML += "</head><body><main>";
  redirectHTML += "<h1>Redirecting</h1><p>Redirecting to Pumpkin Controller<p>";
  redirectHTML += "</main></body></html>";
  server.send(200, "text/html", redirectHTML);
}
When the web server serves it, this is the page that's delivered to the web browser:
<html>
  <head>
    <title>Redirecting</title>
    <meta http-equiv='Refresh' content="3; url='https://pumpkin-controller.netlify.app?192.168.86.230'" />
    <link rel='stylesheet' href='https://unpkg.com/mvp.css'>
  </head>
  <body>
    <main>
      <h1>Redirecting</h1>
      <p>Redirecting to Pumpkin Controller<p>
    </main>
  </body>
</html>
And this is what the page looks like in the browser:

To access the page, all you have to do is open your browser of choice and type pumpkin.local in the address bar. The browser will connect to the web server running on the ESP32 and request the root page.
What this page does is render in the browser for three seconds, then redirects the browser to the Netlify hosted Pumpkin LED Controller app. With this configuration, my sketch delivers a very simple root page (pretty slowly) but users get the fully loaded page from elsewhere. When I make updates to the Pumpkin Controller, I can make and publish those changes to Netlify and not have to make any changes to the sketch running in the ESP32. With this configuration you can use the controller with your device without any additional work.
This is the code in the web app that does the redirection. In the content property the 3 means 3 seconds before redirecting (you can increase or decrease this as you see fit - I made it three seconds so you'd see the page, you could do it immediately and never show the redirect page at all). The URL is the redirect destination.
<meta http-equiv='Refresh' content="3; url='https://pumpkin-controller.netlify.app?192.168.86.230'" />Now, the next thing to notice is the IP address on the redirect URL. The sketch adds it using WiFi.localIP().toString() which provides the current IP address assigned to the ESP32 device. With this in place, I auto-configure the web application with the device's IP address, the user doesn't need to do this step.
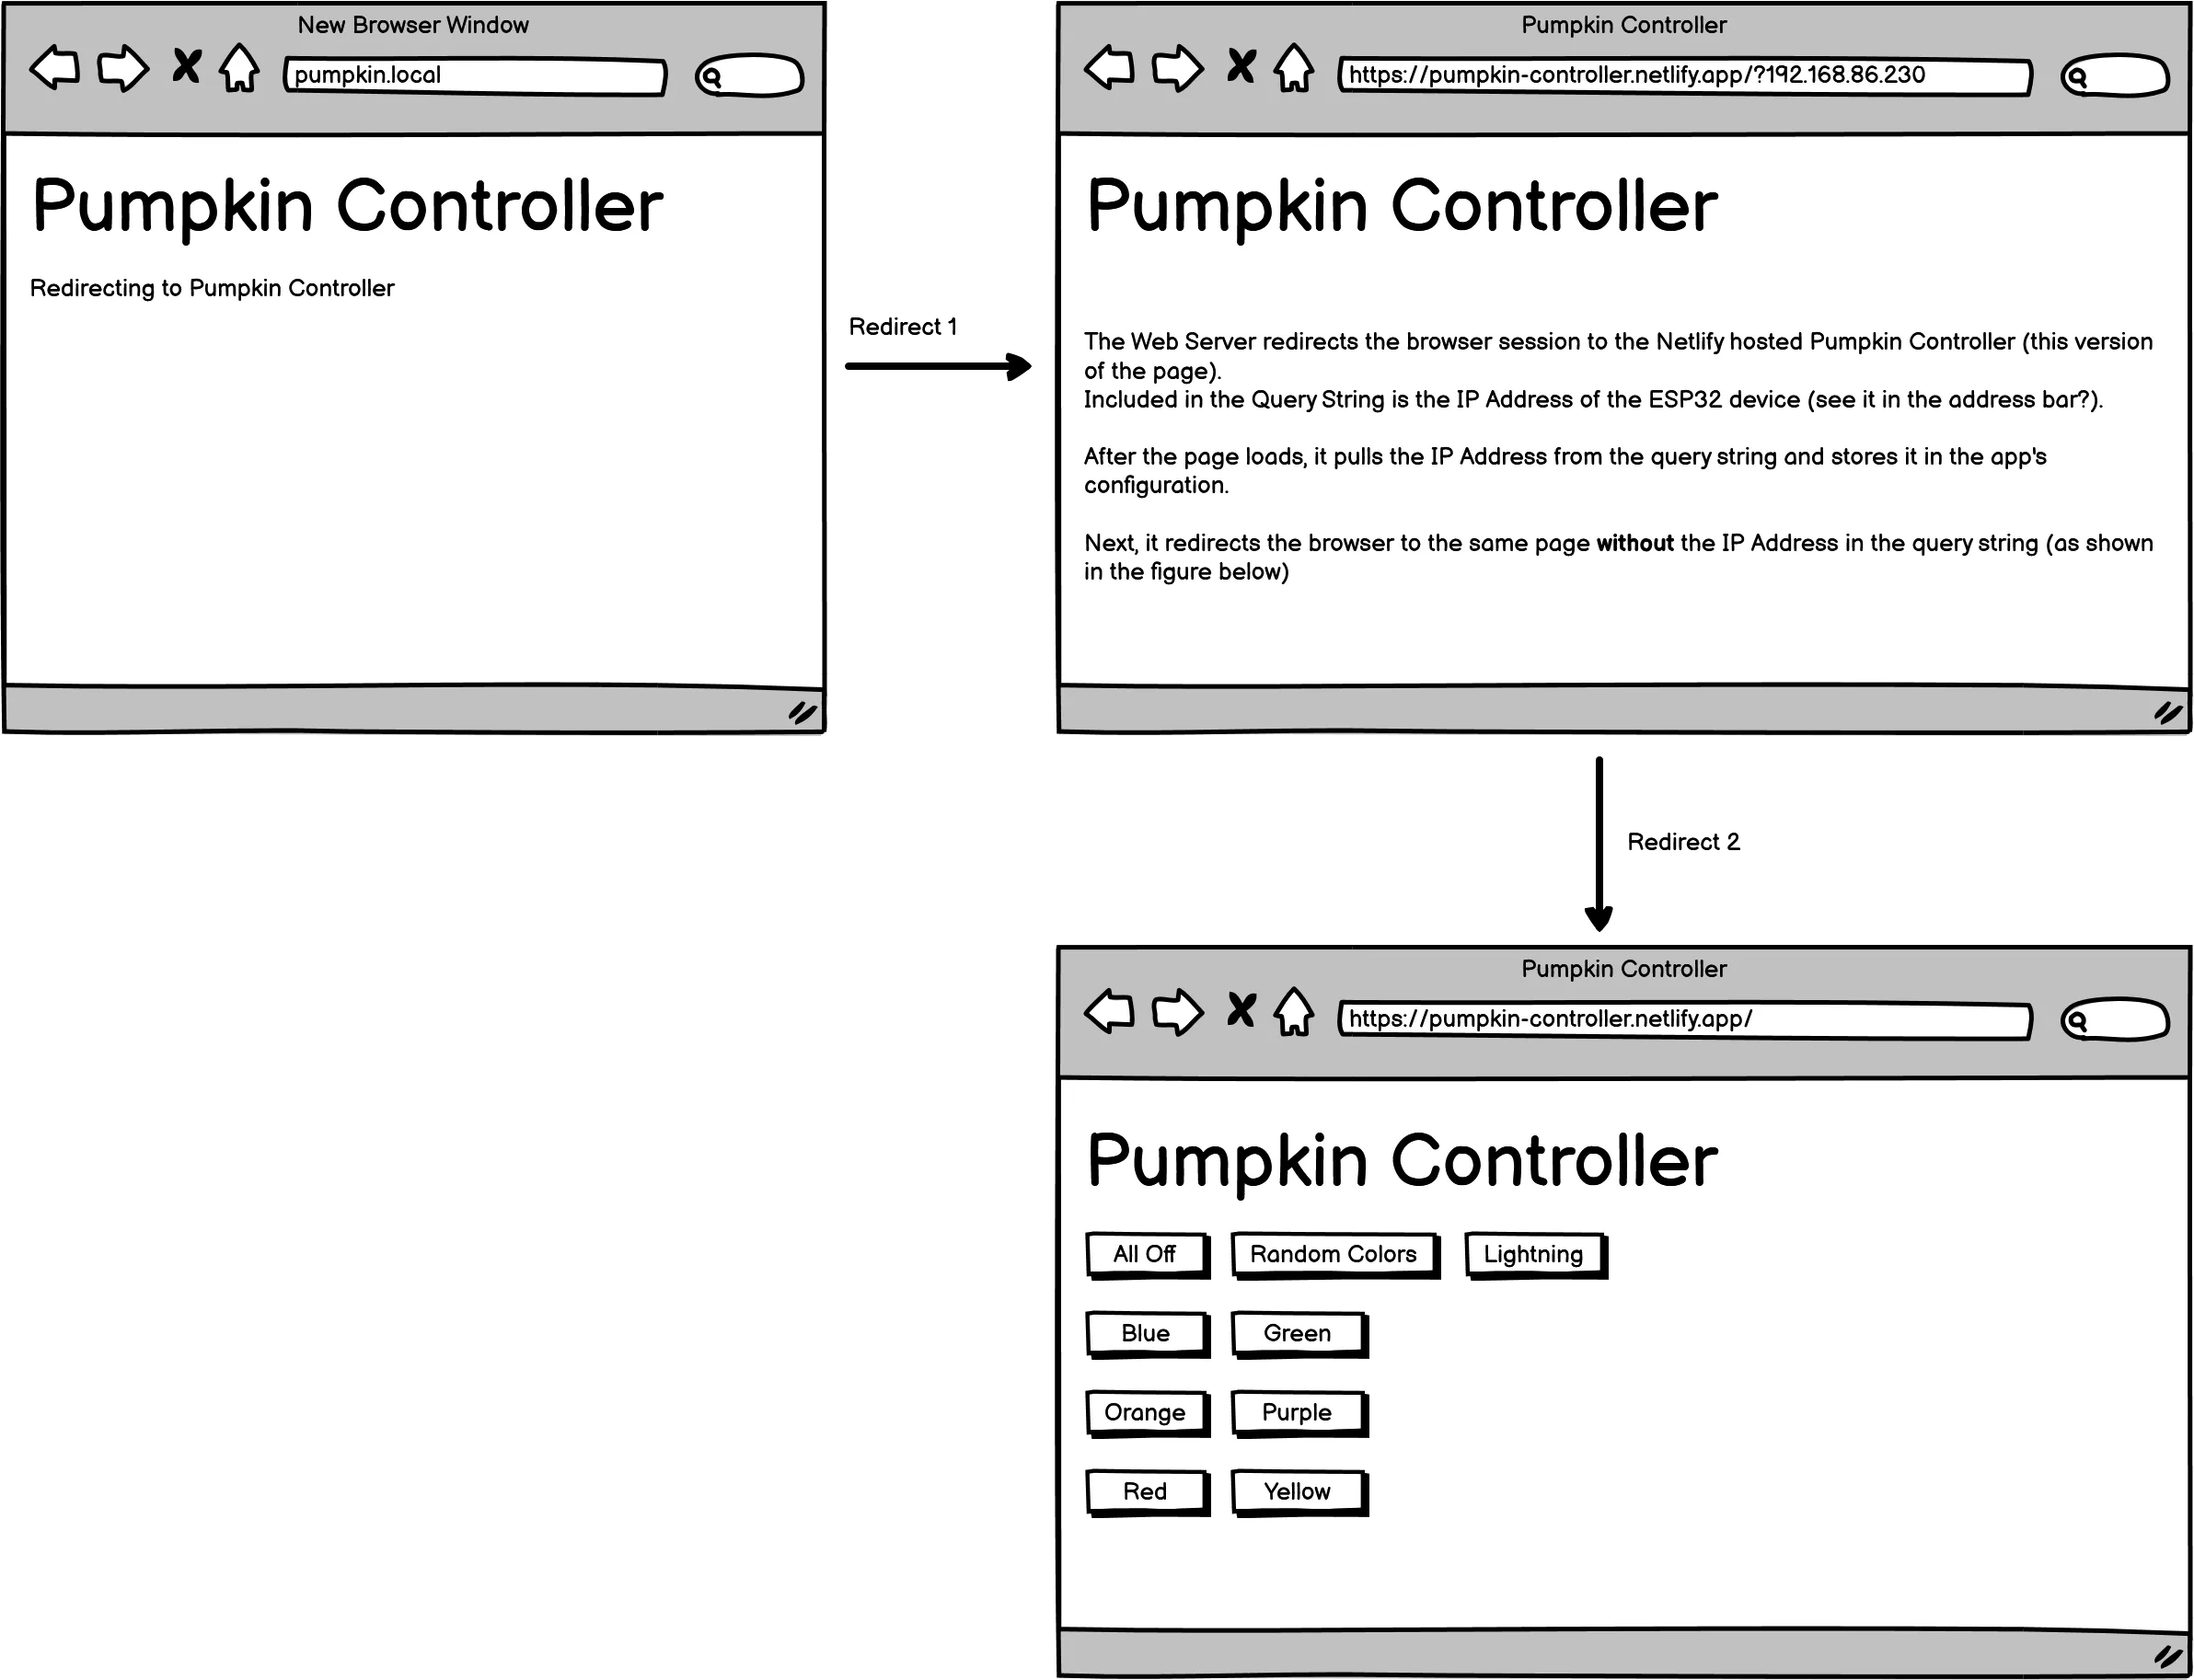
Here's how this process works:
- The Web Server redirects the browser session to the Netlify hosted Pumpkin Controller (this version of the page). Included in the Query String is the IP Address of the ESP32 device.
- After the page loads, JavaScript code on the page pulls the IP Address from the query string and stores it in the app's configuration.
- Next, the page redirects the browser to the same page without the IP Address in the query string (as shown in the figure below).
This is a really clean way to minimize the amount of code you must server from the ESP32 web server and eliminates manual configuration of the device's IP address in the app.
Not Found
Since I'm running this on my local network, I really don't need to deal with unexpected requests from client applications, but the web server library gives you the ability to handle not found errors as shown below. I copied the majority of the code from the example project included with the library.
void handleNotFound() {
displayMessage("Not Found\n");
String message = "File Not Found\n\n";
message += "URI: ";
message += server.uri();
message += "\nMethod: ";
message += (server.method() == HTTP_GET) ? "GET" : "POST";
message += "\nArguments: ";
message += server.args();
message += "\n";
for (uint8_t i = 0; i < server.args(); i++) {
message += " " + server.argName(i) + ": " + server.arg(i) + "\n";
}
server.send(404, "text/plain", message);
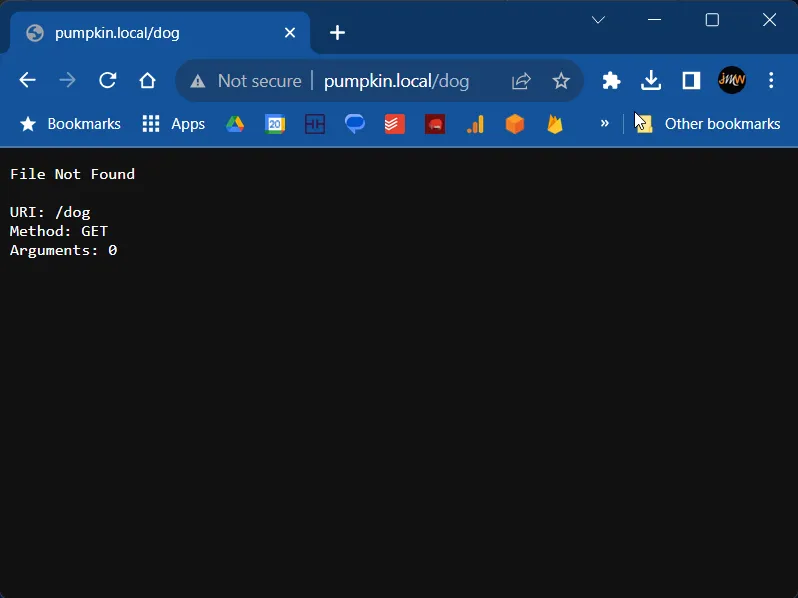
}What this does is return a block of text explaining the error which the browser renders without any styling:
Color
So far I've only shown you web server housekeeping tasks; this section and the next explain a couple of the request handlers used to control the LED matrix.
The handleColor function shown below processes requests to set a specific color on the LED matrix. This particular API requires that the calling program include the color index (from the array shown earlier) in the API query string in the format of color:idx where idx is a single digit number between 0 and 5 (the array lists 6 colors). For this, the WebServer library supports two options: braces or RegEx. What this means is that when redirecting the request to its handler, the web server can either assume everything beyond a core string is parameters to the API like this:
server.on(UriBraces("/color:{}"), handleColor);This works for my API, so this is the approach I used. With the RegEx approach you can match the query string with the handler using a regular expression.
Here's the code that processes the request:
void handleColor() {
  int color;
  String colorStr = server.pathArg(0);

  // Only accept GET requests, this addresses a problem caused by
  // CORS preflight check requests that the web server library
  // doesn't deal with correctly (OK, not at all)
  if (server.method() != HTTP_GET) return;
  displayMessage("color: " + colorStr);

  color = colorStr.toInt();
  if (color > numColors - 1) {  // invalid color idx
    allOff();
    sendError();
    return;
  }
  sendSuccess();
  disableRandom();
  fadeColor(colors[color]);
}
Notice how it takes the pathArg, which in this case is the color array index, converts it to an integer, then uses it to select the color passed to the function that sets a specific color on the LED array. This is an example of very simple single parameter parsing.
Flash
For the Flash option, the API requires that the calling program provide two parameters: the color array index (integer from 0 to 5) and the number of times the LEDs should flash that color. This function is very similar to the previous example, except that it's a little harder to parse two parameters. Here's the code:
void handleFlash() {
  int color, count;
  String uriParms = server.pathArg(0);

  // Only accept GET requests, this addresses a problem caused by
  // CORS preflight check requests that the web server library
  // doesn't deal with correctly (OK, not at all)
  if (server.method() != HTTP_GET) return;
  displayMessage("flash: " + uriParms);

  color = uriParms.charAt(0) - '0';
  count = uriParms.charAt(2) - '0';
  // invalid color idx or count
  if (color > numColors - 1 || count > 5) {
    sendError();
    allOff();
    return;
  }
  sendSuccess();
  flashLEDs(colors[color], count);
}
In this example, uriParms contains colorIdx:count (something like this 3:2 meaning color purple two times), so the code must pull off the 0th and 2nd character from uriParms. What the code gets back from that is the characters representing 3 and 2, so when you subtract the character 0, you get an integer value representing the character: 3 and 2.
Conclusion
I hope this helps you learn how to deploy a web server to an ESP32 device. In Accessing an Arduino ESP32 Web Server I discuss the different options for connecting to the web server from devices and tools plus dig into the difficulties with some of the options. For example, it's impossible to connect to the web server using a mobile browser - I'll explain why in the next post and show you how to get around it.
Next and/or Previous Posts
<< Glowing Pumpkin Project Refresh Arduino ESP32 Running Tasks On Multiple Cores >>
Header image: Photo by Robin Glauser on Unsplash.