 John M. Wargo
DFRobot mmWave RADAR

Posted: July 16, 2023 | | Categories: Internet of Things (IoT)
Links On This Page
A couple of months ago, I started planning my Halloween project for this year. In previous years I've created a Candypult (for the pandemic years), a remotely controlled flame breathing pumpkin (Sparky, we call him), and, my favorite, the twinkle light tubes from last year.
This year I'm making a sleeping dragon. The first step for this project is to make an interactive lighted sign. I reached out to a designer I've used on Fiverr and he quickly drew this up for me:

Next, I sent the design to the folks at Ponoko to have them LASER cut the design on some acrylic. Finally, I wired up a Microcontroller to some NeoPixels to illuminate the sign. I'll write more about the sign hardware after I've built an enclosure for it.
What I want to do with this project, or at least this part of it, is illuminate the sign a certain way by default, but flash the NeoPixels differently when someone is nearby. I originally thought I'd use a PIR Sensor for this, but then I started reading about mmWave sensors that can detect humans and I realized I just had to use one for this project. A sensor like this should be able to distinguish between humans and other things (like dogs), so that would make this project... better.
DFRobot offer a mmWave Radar - 24GHz Human Presence Detection Sensor (9 Meters) that seems perfect for this project and the folks at DFRobot were kind enough to provide me with one to evaluate.
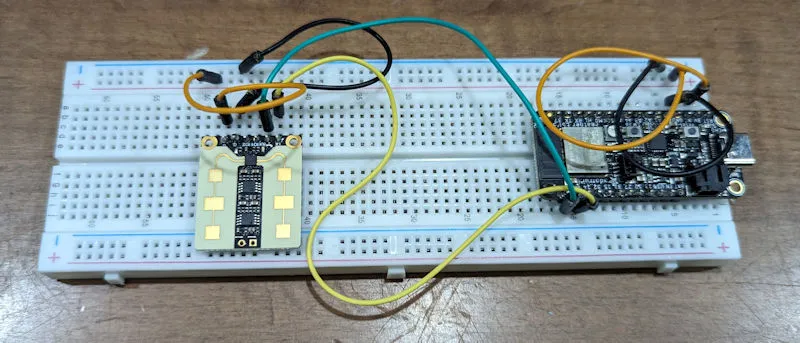
The sensor communicates with a microcontroller (or whatever you want to connect it to) using a serial interface, so you'll need to connect power (V+ and GND) as well as transmit (TX) and receive (RX) connections. Here's an image of my POC configuration:
To use this sensor, you face the antennas toward the detection area and the SDK offers multiple options for configuring detection range and more. The device was really easy to wire into my project; I'll show you the full hardware build out for this closer to Halloween. Installing the required library and getting it working was very easy as well.
Here's the code I used to validate the sensor's operation, I'll explain the code and more after the code.
/*!
   @file DFRobot_mmWave_Radar.ino
   @ Read whether there is people or object moving in the detection range of the sensor.
   @ The sensor detection range and output delay time can be configured. Also you can restore the sensor to factory default settings.
   @n Experimental phenomenon: When the sensor starts successfully, 0 or 1 will be printed on the serial monitor.
   @ 0 means that there is no human or object moving in sensing area, 1 means the oppposite.
   @copyright   Copyright (c) 2010 DFRobot Co.Ltd (https://dfrobot.com)
   @licence     The MIT License (MIT)
   @version  V1.0
   @date  2023-3-13
   @https://github.com/DFRobot
*/

#include <DFRobot_mmWave_Radar.h>

HardwareSerial mySerial(1);
DFRobot_mmWave_Radar sensor(&mySerial);

void setup() {
  Serial.begin(115200);
  mySerial.begin(115200, SERIAL_8N1, 20, 22);  //RX,TX
  pinMode(LED_BUILTIN, OUTPUT);

  sensor.factoryReset();     //Restore to the factory settings
  sensor.DetRangeCfg(0, 3);  //The detection range is as far as 3m
  sensor.OutputLatency(2, 2);
}

void loop() {
  int val = sensor.readPresenceDetection();
  digitalWrite(LED_BUILTIN, val);
  Serial.println(val);
}
The hardest aspect of this for me was configuring serial communication with the sensor. I'd never user serial communication to talk to a sensor before, so I was unfamiliar with HardwareSerial (and its sibling SoftwareSerial).
Apparently, due to microcontroller hardware configuration, some boards can support multiple Serial connections. Those devices use HardwareSerial to talk to the embedded serial communication hardware. For those devices that don't have the required hardware, use SoftwareSerial instead. Once I sorted out that the board I used, the Adafruit ESP32 Feather V2 had the required hardware I was all set.
The code starts by defining a hardware serial port then initialized the mmWave library to use it:
HardwareSerial mySerial(1);
DFRobot_mmWave_Radar sensor(&mySerial);
In setup(), reset the device to factory settings, then configure the detection range (3 meters in this case) and output delay time:
sensor.factoryReset();     //Restore to the factory settings
sensor.DetRangeCfg(0, 3);  //The detection range is as far as 3m
sensor.OutputLatency(2, 2);
OutputLatency controls how long the sensor waits after detecting something and how long after the person leaves detection range before the sensor notifies the application:
/**
  @brief  Configure sensor output delay time
  @param par1 When a target detected, delay the output time of sensing result, range:0~1638.375, unit: s
  @param par2 When the target disappears, delay the output time of sensing result, range: 0~1638.375, unit: s
*/
void OutputLatency(float par1, float par2);
In this example, it waits 2 seconds before notifying the app and waits two seconds after it leaves detection range before telling the app that its gone. This allows my project to wait a bit before reacting.
In the loop, the code reads the sensor, turns the microcontroller's onboard LED on or of depending on whether it detected a human or not (options are basically HIGH (detected) and LOW (not detected)).
void loop() {
  int val = sensor.readPresenceDetection();
  digitalWrite(LED_BUILTIN, val);
  Serial.println(val);
}
Here's a Gist of the code.
That's basically it, the sensor is very easy to integrate in projects and really easy to code to as well. The documentation is complete and very good as well. I'll show you the complete project and code closer to Halloween.
One thing I didn't like about the sensor is that it has an Onboard LED that illuminates when it detects something. I understand why DFRobot would add this to the sensor, so user cn tell its working, but for my particular project, I don't want that. DFRobot didn't include an option for disabling the LED in the SDK; I hope they do so in a future update. I will likely cover the LED in my project.
<< Eleventy Category Images AI Developer Tools in Action >>
Header image: Photo by Robin Glauser on Unsplash.