Adding a GitHub Repository List to an Eleventy Site (part 2)

Posted: December 23, 2023 | | Categories: Eleventy, JavaScript
In my previous post (Adding a GitHub Repository List to an Eleventy Site), I showed how to add a list of public repos to an Eleventy site using the GitHub REST API. In that post, I used unauthenticated access to the API as a quick and easy approach to solving the problem. Unfortunately, rate limits for unauthorized access causes the code to fail when testing the site using eleventy --serve since the data file processes every time you save any content file the project. With my GitHub account's 110 public repositories, it only takes 20 saves in an hour to hit the 60 API calls per hour limit.
I decided to split this topic out into a separate post because I planned to build an Eleventy plugin for the authenticated version, letting an 11ty developer pass the API key and account name to the plugin when loading (instead of modifying the code), but I wasn't able to get to work properly since Eleventy plugins can't handle asynchronous code. If I ever get that working, I'll share the plugin with you.
To access the GitHub API in authenticated mode, all you have to do is generate an API key and pass it in the headers request to the REST API. The code is very similar to the earlier example (previous post), the only differences are that it uses an environment variable to store the GitHub API Key:
// get API key from the environment
const apiKey = process.env.GITHUB_API_KEY;
And it passes the GitHub API Key as a header value in the call to fetch:
// setup fetch options
const options = {
  headers: {
    'Authorization': `Bearer ${apiKey}`,
    'User-Agent': appName
  }
};

repoURL = `https://api.github.com/users/${githubAccount}/repos?per_page=100&page=${++currentPage}`;
var response = await fetch(repoURL, options);
To access the repository list using Eleventy, create a file called repos.js and placed it in the site's _data folder (/src/_data/repos.js) and copy the following code into the new file (replacing the johnwargo in const githubAccount = 'johnwargo'; with your GitHub account name).
const githubAccount = 'johnwargo';

module.exports = async function () {

  const appName = 'github-repos-sample-authenticated';
  var currentPage = 0;
  var done = false;
  var repoURL = '';
  var result = [];

  // get API key from the environment
  const apiKey = process.env.GITHUB_API_KEY;
  // make sure we have an API key
  if (!apiKey) {
    console.error(`[${appName}] Error: Missing GITHUB_API_KEY environment variable`);
    process.exit(1);
  }
  // setup fetch options
  const options = {
    headers: {
      'Authorization': `Bearer ${apiKey}`,
      'User-Agent': appName
    }
  };

  console.log(`Fetching GitHub repositories for ${githubAccount} (authenticated)`);
  // loop until the last page (fetch returns no repositories)
  while (!done) {
    repoURL = `https://api.github.com/users/${githubAccount}/repos?per_page=100&page=${++currentPage}`;
    console.log(`Fetching ${repoURL}`);
    var response = await fetch(repoURL, options);
    var tempRes = await response.json();
    if (response.status == 200) {
      if (tempRes.length === 0) {
        done = true;
      } else {
        console.log(`Retrieved metadata for ${tempRes.length} repos`);
        result = result.concat(tempRes);
      }
    } else {
      console.error(`\nError: ${response.status} - ${response.statusText}\n`);
      if (tempRes.message) console.log(tempRes.message, tempRes.documentation_url);
      process.exit(1);
    }
  }
  console.log(`Retrieved metadata for ${result.length} repos`);
  return result;
};
I created a simple Eleventy site to demonstrate this at Eleventy Display GitHub Repositories (auth). This version displays the repositories as an unordered list on the sample page.
Generating a GitHub API Token
Before you can use this code, you must create a GitHub API token (GitHub calls them Access Tokens, so I'm going to switch to that name from here on) and save it as an environment variable on the system that builds your Eleventy site. I stored it in the environment on my local development system plus added it as an environment variable in my Netlify configuration (where I build and host the site).
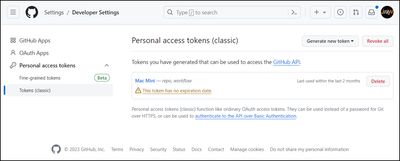
To access your GitHub account's Access Tokens, open a browser, authenticate to your GitHub account, then navigate to https://github.com/settings/tokens to manage your account's access tokens.

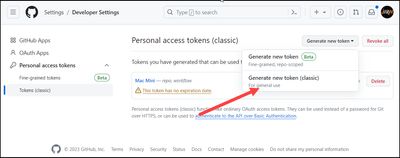
Click the Generate new token button, then select Generate new token (classic).

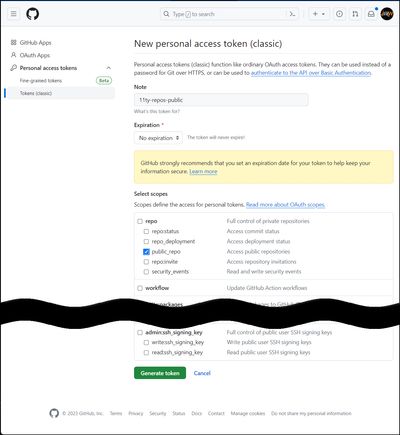
Populate the form that appears with a unique name for the access token. For scopes (access areas for the access token), the only option you need for this is public_repo.

I could grant more scopes here, but that's unnecessary since all the code's doing is reading the public repo list.
Click the Generate token button to create the token. GitHub generates the token and opens the manage tokens page where you have a single, immediate, and only option to copy the generated token. Copy the token right away and don't share it with anyone. As soon as you refresh the page or navigate anywhere else in the browser, you lose your change to copy the access token.
Next, create an environment variable on the system; the following figure shows part of the process on Microsoft Windows:

Next Post: Execa Node Process Spawning
Previous Post: December Updates to Eleventy Plugin Stats
If this content helps you in some way, please consider buying me a coffee.
Header image: Eleventy Project Home Page.