Upgrading Old Flutter Apps

Posted: Saturday, December 28, 2024 at 11:31 AM | Categories: Flutter, Mobile Development
I recently purchased a Google Pixel 9 phone and migrated all of my stuff to it. The transfer process is very thorough and gets all of my app store apps plus existing data. Unfortunately, Google's migration process doesn't migrate applications I deployed to the device via side-loading (installing them directly on the device using Android Studio). These are Flutter apps I wrote for myself and I only update them when I get a new device. This post explains my process for upgrading the apps for new phones.
Do Regular Updates
When you make regular updates to a mobile app, it's easier to keep up with all of the changes the device platform makes to APIs and so on. When you only update them when you get a new phone like I do, the process of getting the app to work on a new phone is quite the nightmare.
Background
I've never been a full time mobile developer; I've had a lot of roles related to mobile development and wrote a bunch of books on the topic, but I've never had a job writing mobile apps. I've written a few for myself and I published a few to the Google Play and Apple App stores, but I don't regularly maintain them. When this means then is that when I try to build and deploy one of my Flutter apps for Android, I have to work my way through all of the changes brought on by:
- Changes to the Android operating system (this is usually permission changes that break APIs)
- Changes to Android APIs
- Changes to the Flutter SDK
- Changes to third-party Dart or Flutter packages
The process could be simple or it could be a nightmare, it just depends on how long it's been since your last app update and how many things changed on the platform and associated dependencies since then.
Brute Force Update
When upgrading a Flutter app for a recent Android release. if you're lucky, you can:
- Load an old Flutter app in Android Studio.
- Connect your new phone to the system using a USB cable
- Build and deploy the app to the new phone with no changes.
That's happened to me a couple of times, but that's not the norm.
There's always something that's not compatible anymore like a deprecated API or a Dart package that isn't maintained. What you have to do this case is work step by step through every error message you get until you finally get the app built and deployed to the connected device. In my experience this process could take hours or days (sadly).
Dependency Updates
There's a couple of steps to pay attention to as you do this, building the app between each step:
- Ensure Android Studio and all associated SDKs and device emulators are up to date. Start the whole process upgrading the entire Android development toolchain.
- Execute
flutter pub upgradein the project to deploy the latest version of all of the project's dependent packages. - Execute
flutter pub outdatedin the project to identify packages that can be upgraded.
That should help you get through many of the issues with the app, but there's no guarantee.
Warnings and Errors
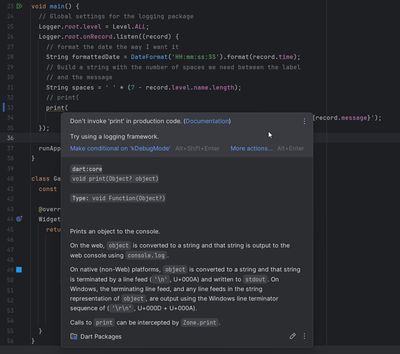
During this process, Android Studio will identify other problems with the application code. In many cases, Android Studio has enough smarts to recognize the error and offer a solution. Using the following image as an example, Android Studio underlines the problem code in yellow (warning) or red (error). Hovering the mouse over the underlined code opens a window that displays the error.

In this case, Android Studio doesn't offer a fix (which is too bad) so note that you can make the warning go away by replacing the print statement with debugPrint.
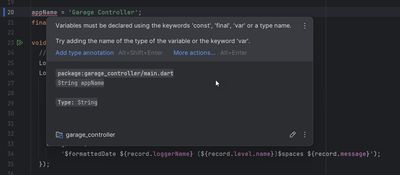
The following image shows a code error and Android Studio knows enough to recommend a fix:

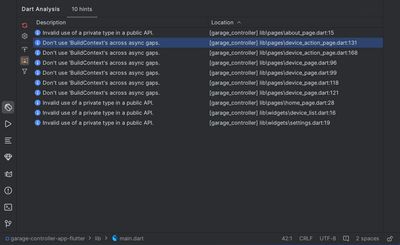
The easiest way to address all of the issues like this in your code is to use the Dart Analysis tool shown below:

It lists all of the errors in the project and, when you double-click on an item in the list, the related file opens in the editor with the offending line of code highlighted. Work your way through each of the items in the list until there's no more changes you can make. In the example, these are items I don't have an immediate fix for; the app runs anyway so I'm not worried about them.
Target Project Errors
Inside a Flutter project for Android is a complete Android application project. The Flutter developer toolchain generates the app and applies specific settings in the app. Often when you're upgrading, you'll find incompatibilities in the underlying Android app and must follow recommendations for fixing those errors.
An upgraded Flutter app often requires changes to an Android app's build.gradle or AndroidManifest.xml file. This is where I get in the most trouble since I'm just not an experienced native Android developer. I can muddle my way though changes to both files if I have the right instructions but I generally don't know what I'm doing.
Flutter Benefit
The cool thing about Flutter is that it isolates you from having to work directly in an Android or iOS project, but there are times when you can't avoid it.
Unfortunately, I don't have an example to show you here as I don't have any pending changes I need to make in my app.
Migrating the App to a New Project
In the case of the app I just finished migrating, a garage controller app I built years ago - first in native Android, then Ionic, and finally Flutter, none of the steps in the previous section worked. No matter what I did, I couldn't get the app 'upgraded' successfully. I'd fix one problem only to have a new one pop up, it was maddening. After a few days mucking around with the app, I finally gave up and started over.
By starting over, I don't mean that I completely rewrote the app. No, in this case, when you get this far and can't get the app to work what you must do is create a new Flutter project, then copy pieces of your old app into it fixing issues as you go. I know it sounds daunting, but it's really not that bad.
Assuming you upgraded your development system's Flutter development toolchain earlier, creating a brand new project creates an app with the most current Flutter app structure, dependencies, APIs and more. For Android apps, the process also creates a project with the latest and greatest Java, Kotlin, Gradle, and other configurations needed to execute the project on your new phone.
Here's my process for this:
- Use the Flutter command-line or New Flutter Project in Android Studio to create a new project in a different folder.
- Starting with the source (the old one you're trying to upgrade) project's
main.dartfile and all of the other files in the Flutter project'slibfolder copy them into thelibfolder in the new project. - Copy the source project's
assetsfolder to the new project. - Copy settings from the source project's
pubspec.yamlfile over to the same file in the new project. - Resolve all of the errors in the new project using the steps from the Brute Force Update Section above.
Once you have everything working correctly in the new project, you must copy the new project's files and folders over the old project. Here's how I do it (assuming you use Git like I do):
- Commit any last minute changes you made to the source project to the project's repository.
- Copy any of the source project files that you created (like the
readme.md,.gitignore, images, assets, and so on) to the new project's root folder. - Create a new branch in the source project folder and switch to the new branch
- Delete all of the files and folders from the source project folder except for the project's
.gitfolder - Copy over all of the files from the new project (except for the
.gitfolder if there is one) to the source project folder - Open Android Studio and open the source project. The project should still be set to the new branch you created earlier.
- Build and deploy the application from the new branch.
- Once you're certain everything works correctly, merge the new branch with the source project's
mainbranch. This completely replaces the original source code with the new project code.
Next Post: Displaying Eleventy Version On A Page
Previous Post: Audi Q7 Drive System Failure
If this content helps you in some way, please consider buying me a coffee.
Header image: https://flutter.io