 John M. Wargo
Simplifying Copying Music Files to a Flash Drive

Posted: Friday, June 6, 2025 at 02:56 PM | Categories: Microsoft Windows, Automobiles
In my previous post I discussed options for playing music files from an SD card or Flash drive on some automobiles. One of the things I didn't mention was how to get those music files onto the drives.
I have almost 30,000 music files, and there's no way any memory stick can hold all of the files with the automobile's music player recognizing the drive. Most automobile music players have capacity and/or file count limitations that make that impossible. So, in order to play my music from an SD card or Flash drive, I could only copy a subset of the files to the drive.
Now, that task isn't very hard, I can insert the drive into my computer and drag any music files I wanted onto the external drive. However, updating the files when an artist releases a new album becomes a problem.
I could write a Windows command file (batch file) and write a bunch of Windows copy or robocopy commands to copy all of my favorite artists' music to the drive. That would work, but, I don't know, I don't want to have to manage the code in that file.
To resolve this, I created a simple Windows application that automates this whole process for me. The application is called Subdirectory Copy (SubCopy) and I published it through Fumbly Diddle Software and the Fumbly Stuff GitHub Repository.
Note: The application uses the free TeraCopy utility to manage the copy process; so you must have TeraCopy installed to use this application. If you find you like the capabilities TeraCopy provides, please consider buying a license.
To use the application, you start by populating the root directory where you have your music files. I've used iTunes for decades, so all my music is in my Itunes Media Music directory (C:\Users\john\Music\iTunes\iTunes Media\Music). Next, you drag all of the artist folders you want to copy to an external drive. This configuration looks like this in the application:
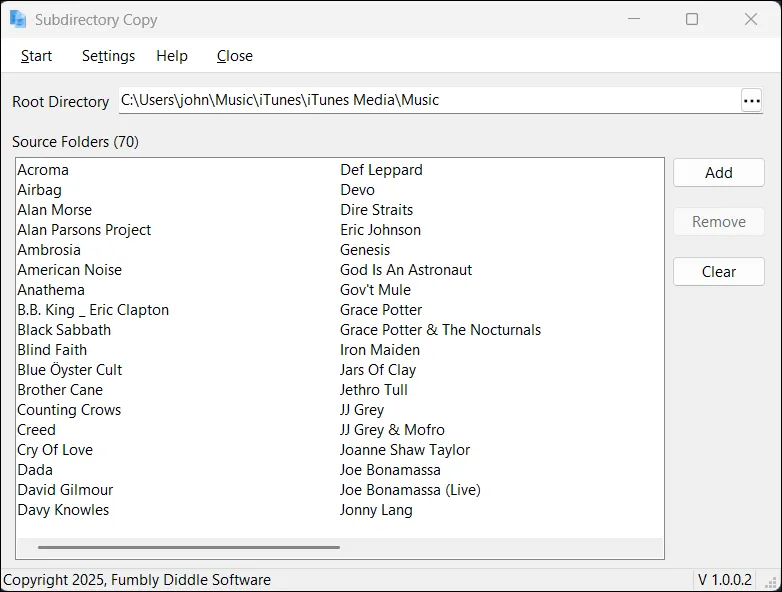
Once you have everything setup, click the Start button in the UI. The application opens a window that lets you configure options for the copy process.
Why TeraCopy?
One of the reasons I used TeraCopy to manage the subdirectory copy process is that it offers command-line options that allows me to easily control the copy process. I simply didn't want to have to write code to handle every possible failure scenario.
TeraCopy allowed me to write a series of source directories to a text file, then pass that file to the TeraCopy application to copy theall of them to the target drive in order. To do this, the SubCopy application creates a temporary file in the Windows temp directory (%temp%) and passes it to TeraCopy to complete the operation.
Here's what the file looks like:
C:\Users\john\Music\iTunes\iTunes Media\Music\Acroma
C:\Users\john\Music\iTunes\iTunes Media\Music\Airbag
.
.
.
C:\Users\john\Music\iTunes\iTunes Media\Music\Warren Haynes
C:\Users\john\Music\iTunes\iTunes Media\Music\Yes
TeraCopy supports different operation types:
- Copy
- Move
- Test
Which allowed me to offer more options without writing much additional code. TeraCopy also supports a variety of copy options:
- Skip All: Skip all existing files.
- Overwrite All: Overwrite all existing files.
- Overwrite Older: Overwrite files if the source is newer.
- Overwrite Different Size: Overwrite if sizes are different.
- Rename Copied File: Automatically rename source files with conflicting names.
- Rename Destination File: Automatically rename target files with conflicting names.
Which also allowed me to offer users more options without writing much additional code.
Next Post: TechSmith Windows Snagit Stops Loading or Capturing
Previous Post: Outlook Pastel Categories macOS