 John M. Wargo
The Solution to My Domino Server Configuration Problem

Posted: April 19, 2013 | | Categories: IBM Lotus Domino, JavaScript
Thanks to all of you who helped out last week as I struggled to get my IBM Lotus Domino server to accept HTTP PUT and DELETE requests. I posted two articles about my issues, you can access them here:
- Domino Server 405 Error
- Update on My Domino Server Problems
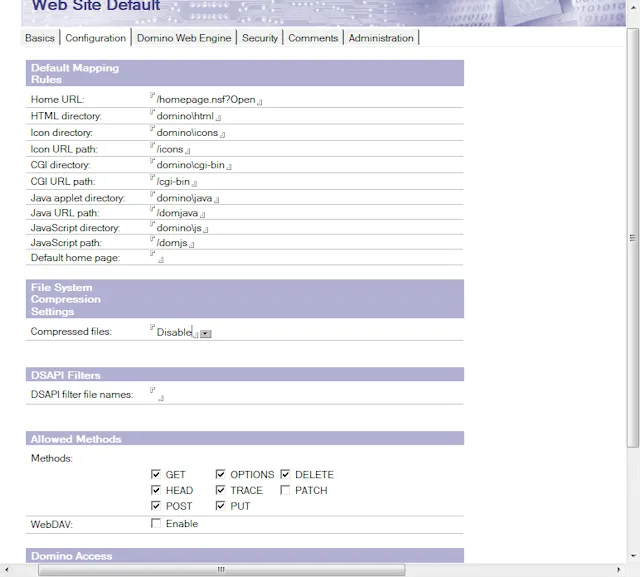
Essentially, I was building a sample Sencha Touch application for an article series I'm writing for The View and the Sencha Touch proxy by default uses different HTTP request types for each of the CRUD operations. The Domino server was refusing PUT and DELETE even though there were settings in the Domino Directory which enabled the server to accept them as shown in the following figure:
The answer came from Stephan Wissel who said:
"... the classic Domino agents to GET/POST not Put. After you allow it you need to have an endpoint that actually handles PUT. A servlet does that. XPages might since it is a servlet (haven't tested it). Classic agents don't. Probably it is easier to reconfigure your app to use POST?"
and Nathan Freeman who said:
"It spells it out right there in the popup on the label for "Methods." You have to write your own Java servlet to handle PUT and DELETE. The native HTTP server simply doesn't process them at all. The checkbox is there just so the web server will accept those methods on the assumption that it's passing the request to a CGI or Java program that can handle them.
You'll have to write a servlet to do what you're trying to do."
So when I enabled the settings shown in Figure 1, all it seemed to do was allow the requests to pass through and I was responsible for implementing a servlet to deal with those requests. Yeah, I'm not doing that.
So, I turned to the Sencha Touch Proxy configuration to see if I could change the way it worked to get around this limitation in the Domino server. When I started the process, I had a very simple proxy configuration as shown in the following code segment:
proxy : {
  type : 'rest',
  id : 'ci-proxy',
  url : 'http://server1/compete.nsf/(rest2)?openagent',
  enablePagingParams : false,
  reader : {
    type : 'json',
    rootProperty : 'ci_data'
  }
}
Looking through the docs, I found that I could add an actionMethods property to my proxy as shown below:
actionMethods : {
  create : "POST",
  read : "GET",
  update : "POST",
  destroy : "POST"
}
What this does is configure which HTTP methods are used for each proxy action type. OK, that seemed cool although it didn't get me all the way there. See, when you change the actionMethods property, you lose the ability to easily detect the CRUD operation on the server side. This doesn't change the URL passed to the Domino server, it only changes the HTTP method used to get to the server.
So, what I had to do next was use the proxy's api property to specify the URL format to use for each request as shown below:
api : {
  create : 'http://server1/compete.nsf/(rest2)?openagent&cmd=create',
  read : 'http://server1/compete.nsf/(rest2)?openagent&cmd=read',
  update : 'http://server1/compete.nsf/(rest2)?openagent&cmd=update&',
  destroy : 'http://server1/compete.nsf/(rest2)?openagent&cmd=delete&'
}
With this in place, I had now configured the proxy to send a differently formatted URL with each request type. That was exactly what I needed; now I simply had to parse the URL on the server to be able to tell what the Sencha Touch proxy was asking me to do.
Note: at about the same time I found these settings in the Sencha Touch documentation I received a comment on the site from Jack Ratcliff with a pointer to these settings. Thanks Jack.
So, at the end of all of this, here's what the Sencha Touch proxy configuration looked like:
proxy : {
  type : 'rest',
  id : 'ci-proxy',
  url : 'http://server1/compete.nsf/(rest2)?openagent',
  enablePagingParams : false,
  actionMethods : {
    create : "POST",
    read : "GET",
    update : "POST",
    destroy : "POST"
  },
  api : {
    create : 'http://server1/compete.nsf/(rest2)?openagent&cmd=create',
    read : 'http://server1/compete.nsf/(rest2)?openagent&cmd=read',
    update : 'http://server1/compete.nsf/(rest2)?openagent&cmd=update&',
    destroy : 'http://server1/compete.nsf/(rest2)?openagent&cmd=delete&'
  },
  reader : {
    type : 'json',
    rootProperty : 'ci_data'
  }
}
Worked like a champ! Thanks everyone.
I'll be finishing up the article this weekend and hopefully you'll see the results in The View in a few weeks.
You may be wondering why only the update and destroy commands have the trailing ampersand - you'll have to read the article to see why (sorry).
Next and/or Previous Posts
<< What Were They Thinking 13 – VZ Navigator Calatrava >>
Header image: Photo by Tamara Gak on Unsplash.