 John M. Wargo
Mounting Multiple NeoPixel Sticks in a Line

Posted: Wednesday, May 14, 2025 at 05:48 PM | Categories: Arduino, ESP32, Internet of Things (IoT), Project Builds
This post describes a 3D printed device I use to mount multiple Adafruit NeoPixel Sticks together in a line. I had a friend create it for a project I'm working on.
I'm building a Throttle Gauge for a friend of mine. He has a Porsche Boxter he's stripped down to the bare minimum that he uses for Autocross racing. He has a camera mounted on the roll bar that records every run, and he wants to be able to include the throttle position and brake activity on the recorded video. To do that, he'll attach this microcontroller controlled throttle gauge to the throttle and brake and measure the status of each in realtime during a run and display status on a line of LEDs.
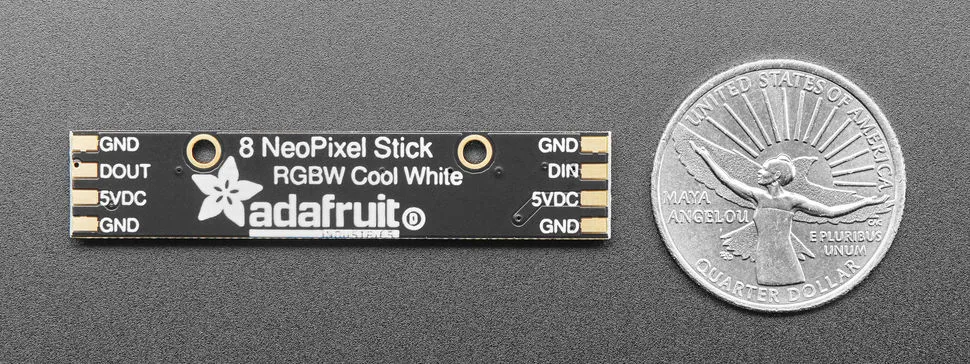
To build this throttle gauge, I needed a line of LEDs that I could individually control from a microcontroller. The Adafruit NeoPixel Sticks are perfect for this; I selected the NeoPixel Stick - 8 x 5050 RGBW LEDs - Cool White - ~6000K. I just needed a simple way to connect them all together in series. I'll explain how I did that in a minute.
For this project, I needed 20 or so LEDs for the throttle gauge; adding 4 for the braking indicator, three 8 LED sticks provided the perfect number of LEDs.
When you look at the back of the NeoPixel Stick, you'll see that the device offers two mounting holes plus solder pads on each end for power, ground, and a single data connection to the microcontroller.
Solution
What I needed was something I could use to line all of the strips together in series, like this: a simple mounting board for three NeoPixel Sticks.

Double the Help
This device helps me two different ways. I used it to hold the NeoPixel Sticks in place as I soldered them, then I turned them over and mounted them LED out for the throttle gauge.
Soldering
I started by mounting the NeoPixel Sticks upside down on the mounting board (NeoPixels facing down) so I could keep them in place as I soldered them together. Next, I melted some solder on each solder pad as shown in the figure.

With that solder in place, it was a simple process to solder connecting wires between the solder pads paired devices. Plus, I connected some wires to the input pads so I could easily wire them into my microcontroller circuit.

I lied, it wasn't a simple process to solder everything together, it was a royal pain. I hate doing this kind of soldering. But, the folks at Adafruit didn't feel the need to make this easy.
Assembly
Next, I used nylon M2 bolts to secure the NeoPixel Sticks to the mounting board. Since I had the soldered connections on the back, I added two washers to give the soldered connections some room.

And here's the complete assembly with nuts on the back holding the mounting board to the NeoPixel Sticks.


yes, I know, they're slightly out of alignment. I'll fix that.
3D Printing Files
I published the 3D printing files for this device on Thingverse: Adafruit NeoPixel Stick Mounting Board 3 Sticks
Next Post: NeoPixel Stick Mounting Issues
Previous Post: FoxAlien Masuter Pro Spindle
Header image: Photo by Sahand Babali on Unsplash