 John M. Wargo
Editing Content in Screenshots

Posted: February 19, 2018 | | Categories: Miscellaneous
I take a lot of screenshots for my books, magazine articles, blog posts and product documentation. I've gotten pretty good at it, not because I have any special skills, instead its all about the tools I use.
I use TechSmith's Snagit tool on Windows and macOS; I've had licenses for this product for more years than I can count. Originally just for grabbing whole screen or window captures, the product's matured a lot over the years and now offers some very flexible options for grabbing screenshots. I love the scrolling window options, although there's a free Chrome plugin that does that as well.
On Linux, I use the free Shutter application, it does everything I need it to do on Linux (which is usually just screenshots of terminal windows or application screens. If I need a full length browser window capture, I'll usually just grab it from a Windows PC or Macintosh.
One thing these tools don't do is give you an easy way to hide or replace confidential information in screenshots. In Snagit I use the Snagit Editor to blur out or color-fill areas of an image to hide information I don't want displayed in the screenshot. I sometimes use Corel's PaintShop Pro to do the same thing, the only difference is whether i'm doing this as part of snapping a screenshot or simply editing a file later. These editing tasks, by the way, are the limit of my image retouching capabilities and I'm very glad that both tools make this easy.
A feature I'd really like in Snagit, and its funny that I've never thought to tell them (TechSmith) this, is that I'd really like to be able to somehow select text elements or inputs on a screen and tell Snagit to blank them out or replace selected content during the screen capture. This way, I can capture my screens and blank out the private information in one seamless process instead of having to capture the image, open an editor, and make my changes. If you're listening TechSmith, make this happen please?
When working with screenshots of web pages or web applications, there is a relatively easy way to get change the content on the page before capturing the screenshot. I've noticed that a many writers don't use this technique, so I thought I'd write about here and show you how it works.
Using your browser's developer tools, you can edit the content of any page. When you save your changes, those changes reflect immediately in the browser window. Then, when you take the screenshot, it shows whatever you want it to show on the page - hiding personal or confidential information you don't want in the screenshot.
Let me give you an example, since I work for Microsoft, I thought I'd use the Azure portal as an example. If you look at the following figure, you can see that the portal thinks my email address is joe dev at acmedynamite dot com and my user name is Joe Developer. Those aren't my actual account details, I simply changed them before taking the screenshot.
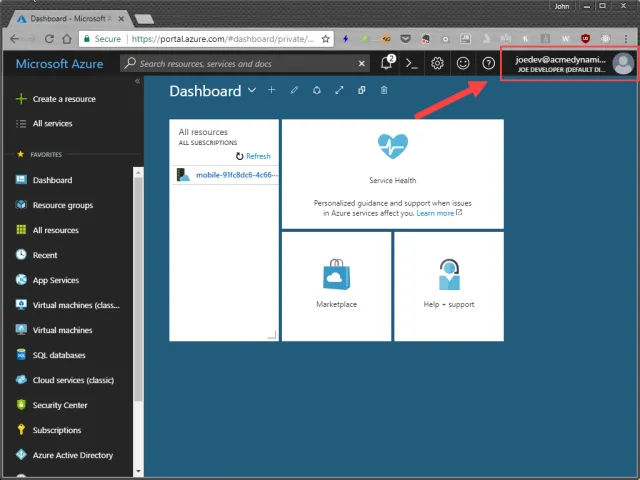
Microsoft Azure Portal (modified)
Let me show you how I did it.
Fixing URLs first
If you're going to include the browser's address bar in your screenshot as I've done in the previous example, you must make sure you edit the URL to remove any personally identifiable information (PII). If, for example, your site's URL was something like this:
https://myimportantsite/somefolder/login&user=someconfidentialusername
You'll should edit out the PII, replacing it with useful, but non-confidential data. For example, many sites use Globally Unique Identifiers (GUID) in URLs to help the server identify the resources, and those often end up in URLs. If you look at the previous figure, you can see that the name for an automatically generated mobile app resource I created in Azure consists of the word mobile plus a GID. Since the full, internal name for resources you use in your app are something you won't want others accessing, when I take a screenshot of a page loading that particular resource, I'll simply let the page load, then edit the URL displayed in the browser, removing any information others can use to access that resource, before taking the screenshot. The edited URL doesn't affect anything, all the existing links on the page will continue to work as expected.
The only problem you'll have is if you put focus on the browser's address bar and press the enter key (triggering a load of the edited URL). Unless what you've typed is a valid URL, the browser won't be able to find the page and you'll see an error.
Another option is to take your browser screenshots omitting the browser chrome (including the address bar). When you do this, all you get is the rendered page, so you won't need to worry about PII from the page address appearing in your screenshot.
Google Chrome Dev Tools
To 'fix' content on a page using the Chrome browser, open the browser to the page you want to screenshot. Next, open the Chrome developer tools (press Ctrl-Shift-I on Windows) then select the Elements tab (highlighted as step 1 in the following figure).
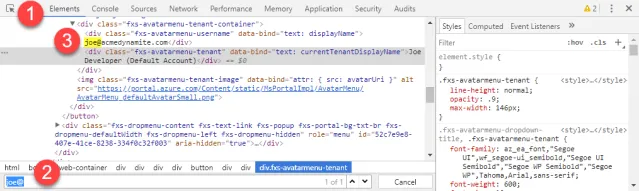
Chrome Developer Tools
Use search to locate the text you want to edit; press Ctrl-F on Windows or Command-F on macOS, then type the text you want to find on the page (step 2 in the figure). Chrome will highlight the selected text on the page (step 3 in the figure).
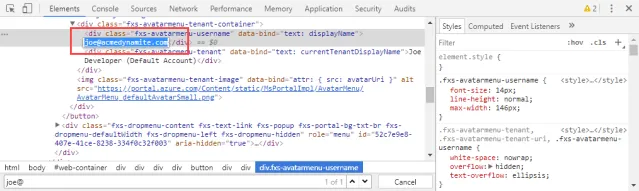
Double-click on the selected text in the window as shown in the figure below, then type the text you want to replace the selected text.
When you press the Enter key to end input, the page will update with your changes. Close the developer tools (Ctrl-Shift-I on Windows) and take your screenshot.
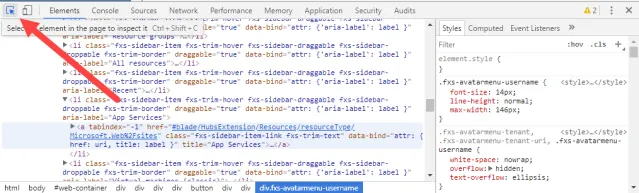
You can also use the Chrome Inspector to locate the source for a particular element on the page. Click the icon highlighted in the following figure, then point to the page element you want to edit. The developer tools will highlight the selected text in the Elements pane - simply double-click on the text you want to edit and make your changes.
Firefox Dev Tools
The Firefox developer tools work a little differently. Open the page you want to screenshot in Firefox, then press Ctrl-Shift-I to open the developer tools. Then use the search field highlighted in the following figure to find the content you want to edit. If your page has more than one instance of your search text, Firefox doesn't display a visual mechanism to navigate between the different instances. Instead, press enter in the search field to navigate to the next instance.
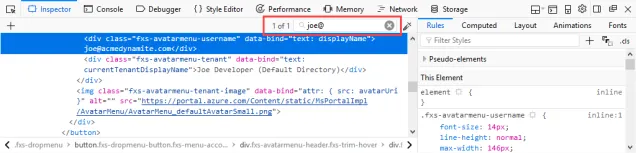
As you did with the Chrome developer tools, simply double-click on the text you want to edit, make your changes, then press the Enter key to commit your changes.
Edge Dev Tools
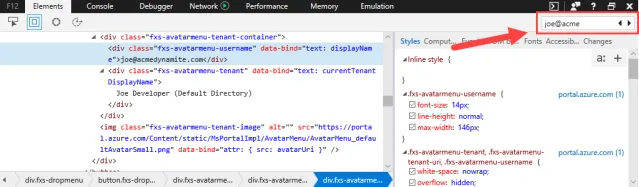
In the Edge browser, things are about the same except that you press F12 to open the developer tools. Once there, you can use the search window highlighted in the following figure to find the text you want to update. Notice that for multiple search hits, Edge gives you arrows you can use to move between instances.
Conclusion
As you can see, it's pretty fast and easy to 'fix' web pages, removing PII, before taking screenshots.
Next and/or Previous Posts
<< Advancing Technology in Wilmington Meetup My First Digital Hotel Key >>
Header image: Photo by Marcos Paulo Prado on Unsplash